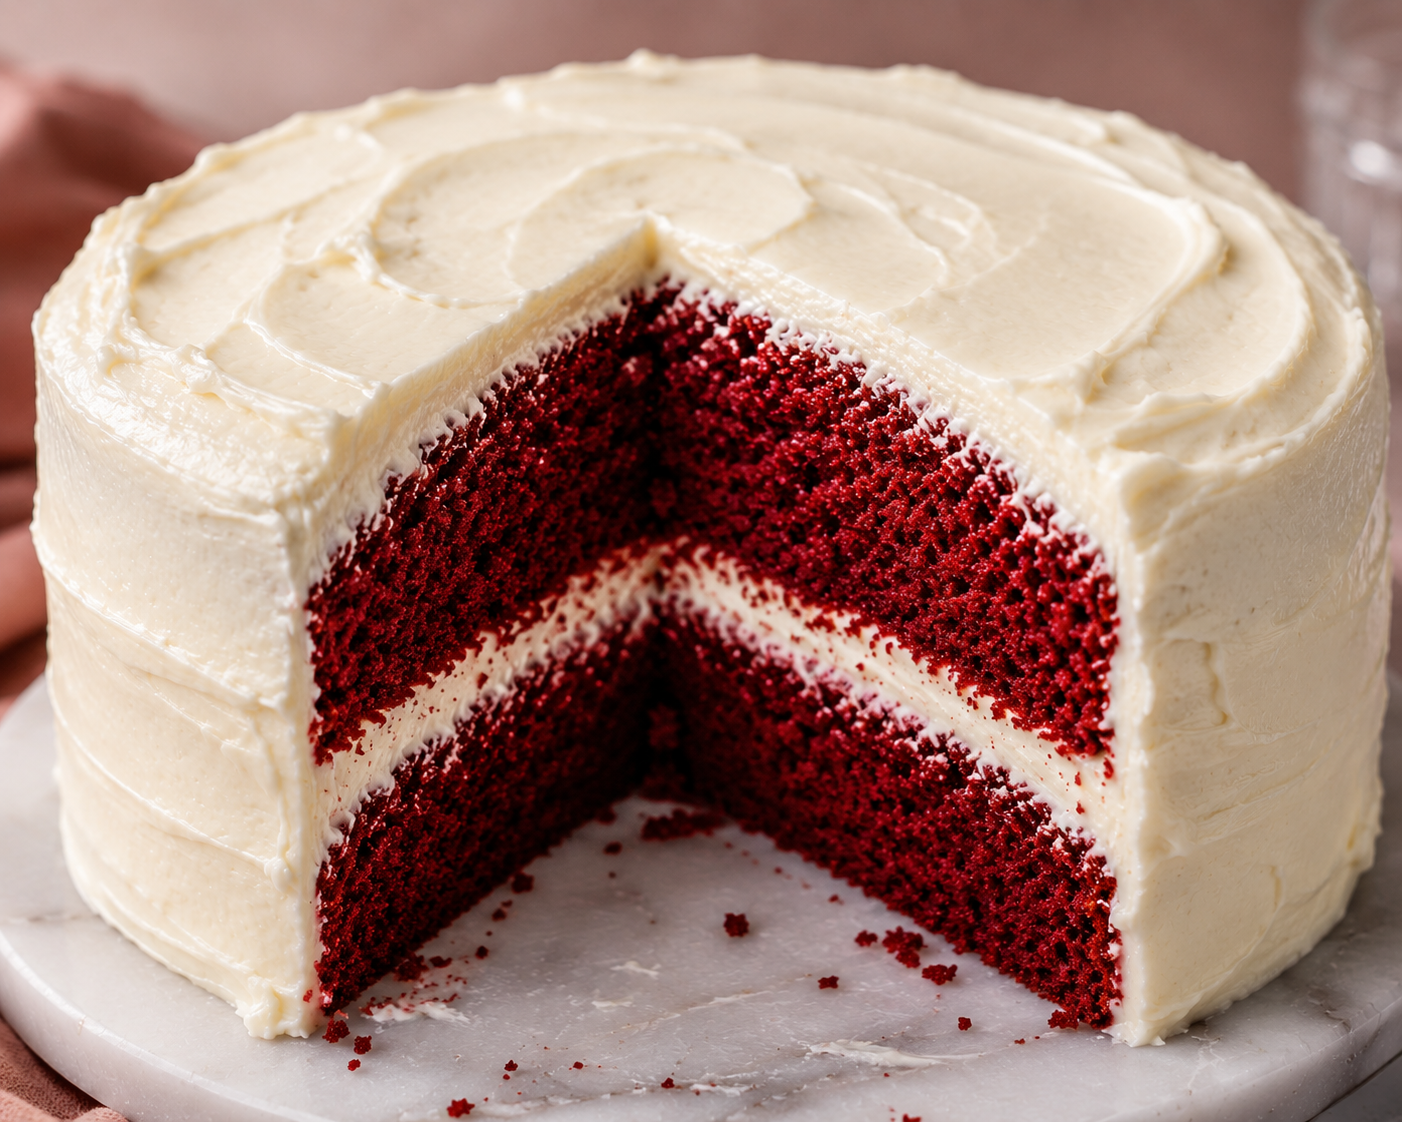
The Best Moist Red Velvet Cake Recipe (Bakery-Style with Cream Cheese Frosting)
The Best Moist Red Velvet Cake Recipe
There is something undeniably timeless about a homemade red velvet cake. With its vibrant crimson crumb, incredibly soft texture, delicate hint of cocoa, and silky cream cheese frosting, it is a dessert that feels both nostalgic and elegant. Unlike recipes that produce dry layers or an overpowering chocolate flavor, this moist red velvet cake strikes the perfect balance — every bite is light yet rich, tender yet sturdy enough to stack into beautiful layers.
The secret is understanding how each ingredient contributes to the final texture. The combination of buttermilk, oil, butter, vinegar, and carefully measured cocoa creates the signature velvety crumb this cake is famous for. Browse more cake recipes from Sugar Face Bakes.
Why You’ll Love This Red Velvet Cake
There are countless red velvet cake recipes online, but this one was developed to deliver everything you expect from a bakery-quality cake while remaining approachable for home bakers.
You’ll love this recipe because:
- Ultra moist without feeling heavy
- Perfectly soft, velvety crumb
- Rich cream cheese frosting that isn’t overly sweet
- Easy-to-follow instructions with professional baking tips
- Stays moist for several days
- Layers bake beautifully flat
- Wonderful for birthdays, weddings, holidays and celebrations
- Freezes exceptionally well
- Beginner-friendly
- Incredible flavor that improves overnight
A Brief History of Red Velvet Cake
Red velvet cake has been delighting dessert lovers for more than a century, with roots tracing back to the early 1900s. The cake earned its name from its signature “velvet” texture—a term once used to describe cakes with an exceptionally soft, fine crumb. Originally, the cake’s subtle reddish hue came naturally from a reaction between natural cocoa powder and acidic ingredients like buttermilk and vinegar. During the Great Depression and World War II, some home bakers even used beet juice to enhance the cake’s natural red color while adding extra moisture when ingredients were scarce. In the 1940s, the Adams Extract Company helped transform red velvet cake into the vibrant dessert we know today by marketing its red food coloring alongside vanilla and other baking extracts, encouraging bakers to achieve the cake’s now-iconic crimson hue. Today, red velvet cake is celebrated for its tender crumb, delicate cocoa flavor, and rich cream cheese frosting, making it a timeless favorite for birthdays, holidays, weddings, Valentine’s Day, and special celebrations.
What Makes This the Best Moist Red Velvet Cake?
Many people assume red velvet cake is simply chocolate cake dyed red—but that’s one of the biggest misconceptions.
Traditional red velvet cake is much more delicate.
Instead of tasting like chocolate cake, authentic red velvet offers subtle cocoa flavor with slight tanginess from buttermilk and vinegar. Combined with vanilla, butter, and cream cheese frosting, the overall flavor is buttery, slightly tangy, mildly chocolaty, and incredibly balanced.
This recipe was carefully developed to create:
✔ Soft, fluffy crumb
✔ Moist texture without becoming oily
✔ Bright, beautiful color
✔ Stable layers for decorating
✔ Bakery-style appearance
✔ Rich flavor that isn’t too sweet
Every ingredient has a purpose, and when they work together, the result is truly unforgettable.
What Is Red Velvet Cake?
Red velvet cake originated in the United States during the early twentieth century and became especially popular in Southern bakeries. Although recipes have evolved over time, the defining characteristics remain the same:
- Soft, fine crumb
- Mild cocoa flavor
- Tangy undertones
- Bright red color
- Cream cheese frosting
Originally, the cake’s reddish hue came naturally from a chemical reaction between natural cocoa powder and acidic ingredients like buttermilk and vinegar. Modern cocoa powder is heavily processed, so today’s recipes rely on food coloring to achieve that iconic deep red color.
The “velvet” in red velvet doesn’t describe the flavor—it refers to the luxurious texture. A properly baked red velvet cake almost melts in your mouth thanks to its incredibly tender crumb.
Why This Recipe Works
Professional bakeries understand that incredible cakes are built on science rather than luck.
Here’s why this recipe consistently produces outstanding results.
Oil + Butter = Perfect Balance
Butter contributes unmatched flavor, while oil keeps cakes moist long after baking.
Using only butter can sometimes produce a slightly firmer cake after refrigeration.
Using only oil creates moisture but sacrifices richness.
Combining both gives you:
- Rich buttery flavor
- Soft crumb
- Moist texture
- Better shelf life
Buttermilk Creates Tenderness
Buttermilk is one of the most important ingredients in red velvet cake.
Its acidity helps:
- Break down gluten
- Produce an incredibly tender crumb
- Activate baking soda
- Add subtle tanginess
- Keep cakes moist
If you’ve ever baked a dry red velvet cake, chances are it lacked enough acidity or moisture.
Vinegar Isn’t for Flavor
Many people worry about adding vinegar.
Don’t.
You won’t taste it.
Instead, vinegar strengthens the reaction with baking soda, giving your cake better rise while enhancing that signature velvety texture.
Think of vinegar as your secret baking assistant—it quietly works behind the scenes to make everything lighter.
Just Enough Cocoa Powder
This isn’t chocolate cake.
Too much cocoa overwhelms the classic red velvet flavor.
Using a modest amount creates:
- Gentle cocoa notes
- Rich color
- Tender crumb
- Balanced sweetness
Cake Flour Makes a Difference
Cake flour contains less protein than all-purpose flour.
Less protein means:
- Softer crumb
- Smaller air pockets
- Delicate texture
- Professional bakery appearance
If you want your cake to resemble one from a specialty bakery, cake flour is absolutely worth using.
Ingredients You’ll Need
For the Cake Layers:
- Cake Flour (2 1/2 cups): Cake flour contains less protein than all-purpose flour, which means less gluten develops during mixing. The result is an exceptionally soft, fine, delicate crumb that defines bakery-quality red velvet. Spoon and level when measuring.
- Natural Cocoa Powder (2 tablespoons): Use natural, not Dutch-process. Natural cocoa is more acidic and works with the buttermilk and vinegar for proper leavening. A small, precise amount creates the subtle chocolate undertone without turning this into chocolate cake.
- Baking Soda (1 teaspoon): Reacts with the acidic buttermilk and vinegar to create lift and produce the velvety texture.
- Salt (1/2 teaspoon): Balances the sweetness and makes every other flavor more pronounced.
- Unsalted Butter, softened (1/2 cup): Provides rich buttery flavor and structure during the creaming stage.
- Granulated Sugar (1 1/2 cups): Creamed with the butter to incorporate air into the batter and create a light, fluffy base.
- Neutral Oil (1/2 cup): Added alongside the butter for long-lasting moisture. Oil stays liquid at room temperature and prevents the cake from drying out even after refrigeration.
- Large Eggs (2), room temperature: Provide structure and richness. Room-temperature eggs emulsify more smoothly into the batter.
- Buttermilk (1 cup), room temperature: Essential for the classic velvety crumb. The acidity tenderizes the cake, activates the baking soda, and adds the subtle tang that defines authentic red velvet.
- Vanilla Extract (2 teaspoons): Rounds out the flavor and adds warmth throughout the cake.
- White Vinegar (1 teaspoon): Strengthens the reaction with the baking soda for better rise and enhances the velvety texture. You will not taste it in the finished cake.
- Red Gel Food Coloring (1 tablespoon, optional): Creates the signature vibrant crimson color. Gel coloring is more concentrated than liquid and achieves a brighter red without adding excess moisture to the batter. Can be omitted entirely if preferred.
For the Cream Cheese Frosting:
- Cream Cheese (16 ounces), room temperature: The base of the frosting. Full-fat brick-style cream cheese only. Cold or reduced-fat cream cheese produces a runny, unstable frosting.
- Unsalted Butter (1 cup), room temperature: Beat until light and fluffy before adding the cream cheese for the smoothest result.
- Powdered Sugar (6 cups): Added gradually to sweeten and structure the frosting. Sift before adding to prevent lumps.
- Vanilla Extract (2 teaspoons): Adds depth and warmth to the frosting.
- Salt (1/4 teaspoon): Balances the sweetness and keeps the frosting from tasting flat.
Equipment You’ll Need
You don’t need a commercial bakery kitchen to make an incredible red velvet cake, but using the right tools makes the process easier and more consistent.
I recommend having:
- Two 8-inch round cake pans
- Parchment paper rounds
- Digital kitchen scale
- Measuring cups and spoons
- Large mixing bowls
- Stand mixer or electric hand mixer
- Silicone spatula
- Fine mesh sieve
- Cooling racks
- Offset spatula
- Cake turntable (optional but helpful for decorating)
- Bench scraper for smooth frosting
- Cake strips (optional for flatter layers)
Before You Begin: Professional Baker Tips
Taking a few extra minutes before mixing the batter can make the difference between a good cake and a truly bakery-worthy one.
Bring Cold Ingredients to Room Temperature
Butter, eggs, and buttermilk should all be at room temperature before mixing.
Room-temperature ingredients emulsify more easily, creating a smoother batter and a finer crumb.
Measure Ingredients Carefully
For the most consistent results, weigh your ingredients with a kitchen scale whenever possible.
Baking is chemistry, and even a small difference in flour can dramatically affect the texture of your cake.
Prepare Your Cake Pans Properly
Grease the pans thoroughly, line the bottoms with parchment paper, then lightly grease the parchment.
This simple step ensures your cakes release effortlessly without sticking or tearing.
Don’t Rush the Mixing Process
Cream the butter and sugar until the mixture becomes noticeably lighter in both color and texture.
This incorporates air into the batter, helping create a lighter cake without relying solely on chemical leaveners.
Preheat the Oven Completely
Allow your oven to fully preheat before placing the cakes inside.
An oven that’s even slightly below temperature can affect rise, texture, and baking time.
How to Make the Best Moist Red Velvet Cake
- Step 1 — Prep the Pans: Preheat the oven to 350 degrees F. Grease two 8-inch cake pans, line the bottoms with parchment circles, and lightly grease the parchment. For exceptionally even layers, wrap the pans with damp cake strips before baking.
- Step 2 — Mix the Dry Ingredients: In a large bowl, whisk together the cake flour, cocoa powder, baking soda, and salt. Set aside.
- Step 3 — Cream Butter and Sugar: Using a stand mixer fitted with the paddle attachment, beat the softened butter and granulated sugar on medium-high speed for 3 to 5 minutes until the mixture is noticeably lighter in both color and texture.
- Step 4 — Add the Oil: With the mixer on low, slowly stream in the oil until fully incorporated.
- Step 5 — Add the Eggs: Beat in the eggs one at a time, mixing well after each addition. Scrape down the sides and bottom of the bowl to ensure everything is evenly combined.
- Step 6 — Add Vanilla, Vinegar, and Food Coloring: Mix in the vanilla extract, white vinegar, and red gel food coloring until the batter is vibrant and uniform in color.
- Step 7 — Alternate Dry Ingredients and Buttermilk: Reduce the mixer to low. Add one-third of the dry ingredients, followed by half of the buttermilk. Repeat, ending with the remaining dry ingredients. Mix only until the flour disappears. Overmixing develops gluten and makes the cake tough instead of velvety.
- Step 8 — Bake: Divide the batter evenly between the prepared pans and smooth the tops with an offset spatula. Bake at 350 degrees F for approximately 28 to 32 minutes until the centers spring back lightly and a toothpick comes out with a few moist crumbs. Avoid opening the oven during the first 25 minutes.
- Step 9 — Cool: Let the cakes cool in the pans for 10 to 15 minutes, then transfer to wire racks to cool completely before frosting.
- Step 10 — Make the Cream Cheese Frosting: Beat the softened butter for about 3 minutes until light and fluffy. Add the cream cheese and beat until completely smooth. Gradually add the sifted powdered sugar one cup at a time. Mix in the vanilla and salt. Beat only until smooth. If the frosting feels too soft, refrigerate for 20 to 30 minutes before decorating.
- Step 11 — Assemble: Trim any domed tops with a serrated knife. Place the first layer on a cake stand and spread approximately 1 1/4 cups of frosting evenly across the surface. Add the second layer upside down for sharp, flat edges. Apply a very thin crumb coat, refrigerate for 20 to 30 minutes, then cover the cake generously with the remaining frosting. Smooth the sides with an offset spatula and bench scraper for bakery-smooth edges.
Expert Tips for Bakery-Style Results
Even simple techniques can elevate your cake from homemade to bakery-worthy.
- Use room-temperature ingredients for a smoother batter and finer crumb.
- Weigh your flour instead of measuring by volume whenever possible.
- Use natural cocoa powder, not Dutch-process, for the classic red velvet flavor and color.
- Mix only until combined after adding the flour to avoid overdeveloping gluten.
- Wrap your cake pans with damp baking strips for flatter, more even layers.
- Chill the cake layers before frosting for cleaner edges and easier decorating.
- Frost the cake in stages, starting with a thin crumb coat before applying the final layer of cream cheese frosting.
- Let the finished cake chill for at least 30 minutes before slicing to achieve picture-perfect slices with clean layers.
How to Make Cream Cheese Frosting
Step 1
Beat the softened butter for about 3 minutes until light and fluffy.
Step 2
Add the cream cheese and beat until completely smooth.
Avoid overmixing after adding the cream cheese, as it can become too soft.
Step 3
Gradually add the sifted powdered sugar one cup at a time.
Step 4
Mix in the vanilla and salt.
Beat only until smooth.
If the frosting feels too soft, refrigerate for 20–30 minutes before decorating.
How to Assemble the Cake
Professional-looking cakes are easier than they seem.
- Level the Layers
If necessary, trim any domes using a serrated knife.
Flat layers stack much more evenly.
- Add Frosting
Place the first cake layer onto your cake stand.
Spread approximately 1¼ cups frosting evenly across the surface.
- Stack
Add the second cake layer upside down.
Using the flat bottom of the cake creates perfectly sharp edges.
- Crumb Coat
Apply a very thin layer of frosting around the cake.
Refrigerate for 20–30 minutes.
This locks in crumbs and creates a smooth foundation.
- Final Frosting
Cover the cake generously with the remaining frosting.
Use an offset spatula followed by a bench scraper for bakery-smooth sides.
Decorate with:
- Fresh cake crumbs
- White chocolate curls
- Chocolate shavings
- Red velvet crumbs
- Fresh berries
- Sprinkles for holidays
Decorating Ideas
This cake is incredibly versatile.
Perfect for:
- Valentine’s Day
- Christmas
- Birthdays
- Weddings
- Baby showers
- Bridal showers
- Mother’s Day
- Easter
- Anniversary celebrations
For an elegant bakery finish, decorate the top border using a large open star piping tip.
Common Mistakes to Avoid
Even experienced bakers make these mistakes.
Avoiding them guarantees success.
- Using Cold Ingredients
Cold butter doesn’t cream properly.
Cold eggs can cause the batter to separate.
- Measuring Flour Incorrectly
Too much flour creates dry cake.
Always spoon and level—or better yet, weigh your flour.
- Overmixing
Too much mixing develops gluten.
Result?
Dense cake instead of velvety cake.
- Opening the Oven Too Early
Wait until the cake has set before opening the oven.
Otherwise the center may sink.
- Using Dutch Process Cocoa
Natural cocoa creates better acidity and classic flavor.
Variations
One of my favorite things about this recipe is how adaptable it is.
Try making:
Red Velvet Cupcakes
Bake approximately 18–22 minutes.
Perfect for birthdays and parties.
Three Layer Cake
Divide among three 8-inch pans.
Reduce baking time slightly.
Creates gorgeous bakery-style presentation.
Sheet Cake
Bake in a 9×13 pan.
Perfect for potlucks and family gatherings.
Mini Cakes
Use 6-inch cake pans for adorable celebration cakes.
Naked Cake
Use less frosting for a rustic bakery look.
Perfect for weddings.
Storage
Cream cheese frosting requires refrigeration.
Store covered for:
Refrigerator:
Up to 5 days.
Allow slices to sit at room temperature for about 30 minutes before serving.
The texture becomes wonderfully soft.
Freezing Instructions
This cake freezes beautifully.
Freeze unfrosted layers:
Wrap tightly in plastic wrap.
Then aluminum foil.
Freeze up to 3 months.
Thaw overnight inside the refrigerator.
You can also freeze individual slices.
Perfect for late-night cake cravings.
Expert Baking Tips
After baking hundreds of cakes, these are the little details that consistently make the biggest difference.
- Use room-temperature ingredients.
- Weigh ingredients whenever possible.
- Sift cocoa powder and powdered sugar to avoid lumps.
- Tap cake pans lightly on the counter before baking to release large air bubbles.
- Rotate pans only if your oven has hot spots—and only after the cake has set.
- Cool cakes completely before frosting.
- Chill the crumb coat before applying the final layer.
- Wipe your knife clean between slices for bakery-perfect presentation.
Why I Love Baking This Cake
There are recipes that come and go, and then there are recipes that become traditions.
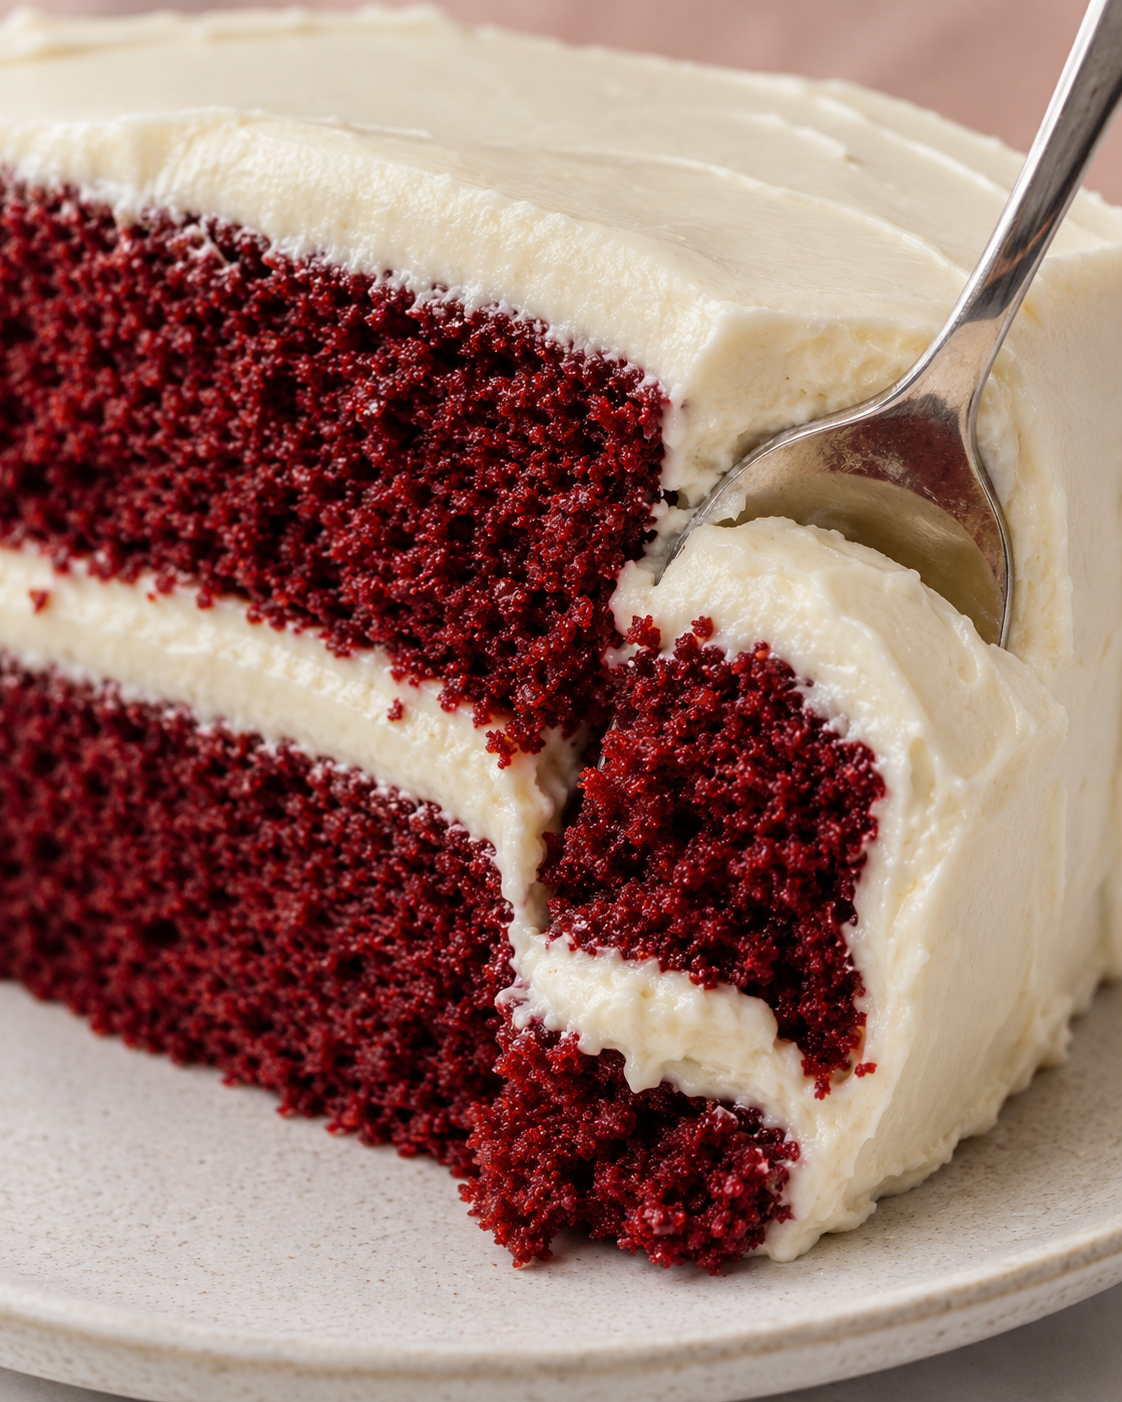
This red velvet cake is one of those recipes I find myself baking again and again—for birthdays, holidays, dinner parties, and celebrations big and small. I love how the soft crimson layers contrast with the creamy frosting, how every slice feels elegant without being fussy, and how the flavor only gets better after a day in the refrigerator.
Whether you’re making it for someone special or simply treating yourself, I hope this cake becomes one of those recipes your family requests year after year.
Caraway Bakeware Makes a Difference
One of my favorite ways to ensure consistent, bakery-style cakes is by baking them in high-quality ceramic-coated bakeware. A well-made cake pan promotes even heat distribution, helping the layers bake uniformly with beautifully tender edges and fewer hot spots.
For this recipe, I love using my Caraway bakeware (shop here for a generous discount applied at checkout!) because the naturally slick ceramic coating allows the cakes to release effortlessly, especially when paired with parchment paper. The heavy-duty construction also helps prevent excessive browning around the edges while encouraging an even rise from center to edge. If you’re investing in bakeware that you’ll reach for again and again, a quality set can make a noticeable difference in both appearance and consistency.
More Cake Recipes You’ll Love
If you enjoyed this homemade red velvet cake, here are a few more reader favorites from my blog to satisfy your sweet tooth:
- Classic Vanilla Cake – Soft, buttery layers with silky vanilla buttercream that are perfect for birthdays and celebrations.
- Chocolate Cake – Rich, deeply chocolatey cake with smooth chocolate frosting for every chocolate lover.
- Chocolate Cheesecake – Creamy, decadent, and finished with a glossy chocolate ganache.
- Tiramisu – A classic Italian dessert layered with espresso-soaked ladyfingers and luscious mascarpone cream.
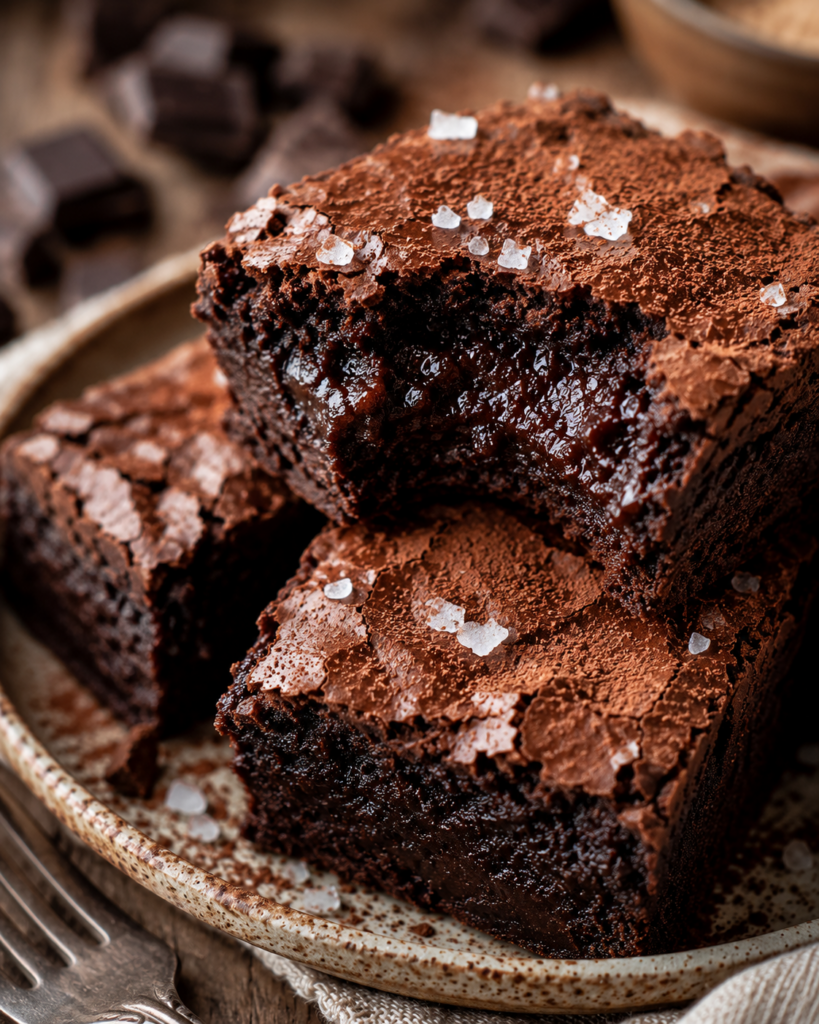
- Brownies – Fudgy, chewy brownies with crackly tops that are perfect for dessert platters and bake sales.
- Cheesecake Collection – Explore creamy baked cheesecakes in a variety of flavors, from classic to chocolate-inspired favorites.
Whether you’re planning a holiday dessert table or simply looking for your next baking project, these recipes pair beautifully with this red velvet cake and are sure to become family favorites.
For more delicious inspiration and video guides, be sure to follow Sugar Face Bakes on YouTube here.
")
Best Moist Red Velvet Cake
Ingredients
- 2½ cups cake flour
- 2 tbsp natural cocoa powder
- 1 tsp baking soda
- ½ tsp salt
- ½ cup unsalted butter softened
- 1½ cups granulated sugar
- ½ cup neutral oil *vegetable oil is always a winner
- 2 large eggs room temperature
- 1 cup buttermilk room temperature
- 2 tsp vanilla extract
- 1 tsp white vingear
- 1 tbsp red gel food coloring optional, for color
For The Cake
For The Cream Cheese Frosting
- 16 oz cream cheese softened to room temperature
- 1 cup butter softened to room temperature
- 6 cups powdered sugar
- 2 tsp vanilla extract
- ¼ tsp salt
Instructions
- Preheat your oven to 350°F (175°C). Grease two 8-inch cake pans, line the bottoms with parchment circles, and lightly grease the parchment.
- In a large bowl, whisk together flour, cocoa powder, baking soda, and salt. Set aside.
- Using a stand mixer fitted with the paddle attachment, beat the softened butter and granulated sugar on medium-high speed for 3–5 minutes, until the mixture is noticeably lighter in both color and texture.
- With the mixer on low speed, slowly stream in the oil until fully incorporated.
- Beat in the eggs one at a time, mixing well after each addition. Scrape down the sides and bottom of the bowl to ensure everything is evenly combined.
- Mix in the vanilla extract, white vinegar, and red gel food coloring until the batter is vibrant and uniform in color.
- Reduce the mixer to low speed. Add one-third of the dry ingredients, followed by half of the buttermilk.
- Repeat the process, ending with the remaining dry ingredients.
- Mix only until the flour disappears. Overmixing develops gluten and can make the cake tougher instead of velvety.
- Evenly divide the batter between the prepared cake pans and gently smooth the tops with an offset spatula.
- Bake until the centers spring back lightly when touched and a toothpick inserted into the middle comes out with a few moist crumbs.
- Let the cakes cool in their pans for about 10–15 minutes before carefully turning them onto wire racks to cool completely.
For The Frosting
- Beat the softened butter for about 3 minutes until light and fluffy.
- Add the cream cheese and beat until completely smooth.
- Gradually add the sifted powdered sugar one cup at a time.
- Mix in the vanilla and salt. Beat only until smooth.
Assembly
- If necessary, trim any domes using a serrated knife. Flat layers stack much more evenly.
- Place the first cake layer onto your cake stand. Spread approximately 1¼ cups frosting evenly across the surface.
- Add the second cake layer upside down. Using the flat bottom of the cake creates perfectly sharp edges.
- Apply a very thin layer of frosting around the cake. Refrigerate for 20–30 minutes.
- Cover the cake generously with the remaining frosting. Use an offset spatula followed by a bench scraper for bakery-smooth sides.
- Decorate how you like.
Notes
Nutrition Information
Approximate per serving (1 of 16): Calories: 590 Carbohydrates: 67g Protein: 6g Fat: 33g Saturated Fat: 18g Cholesterol: 90mg Sodium: 290mg Sugar: 49g Fiber: 1g Calcium: 95mg Iron: 1.8mgFrequently Asked Questions
How long does red velvet cake last in the fridge?
Red velvet cake keeps in the refrigerator for up to 5 days stored covered or in an airtight container. The cream cheese frosting seals in moisture and keeps the layers fresh. Before serving, bring the red velvet cake to room temperature for 30 minutes so the frosting softens and the full, buttery flavor comes through.
Can I freeze red velvet cake?
Yes, red velvet cake freezes well for up to 3 months. Wrap each unfrosted cake layer individually in plastic wrap, then again in foil, and freeze flat. Thaw overnight in the refrigerator before frosting and assembling. Frosted red velvet cake can also be frozen — chill the assembled cake until the frosting is firm, then wrap tightly before freezing.
Can I make red velvet cake ahead of time?
Yes. The unfrosted red velvet cake layers can be baked up to 2 days ahead and stored tightly wrapped at room temperature, or frozen for up to 3 months. The flavor of red velvet cake actually deepens slightly overnight. Frost and assemble the day before serving or the day of for the best presentation and freshest cream cheese frosting.
Can I make red velvet cake without red food coloring?
Yes. You can omit the red food coloring entirely and this red velvet cake will taste identical. The crumb will be a warm light brown instead of crimson. Beet powder is a popular natural alternative — start with 1 to 2 tablespoons and adjust to reach your desired color, though the red will be softer and more muted than gel food coloring.
Can I substitute all-purpose flour for cake flour in red velvet cake?
Yes, but the texture will be slightly different. Cake flour produces the signature delicate, velvety crumb that red velvet cake is known for. If substituting all-purpose flour, replace each cup of cake flour with 1 cup minus 2 tablespoons of all-purpose flour, plus 2 tablespoons of cornstarch per cup. Sift well before using. The result is a slightly sturdier but still very good red velvet cake.
More Dessert Recipes
Looking for more easy and comforting meals? Browse all recipes here:
")
")
")
")

