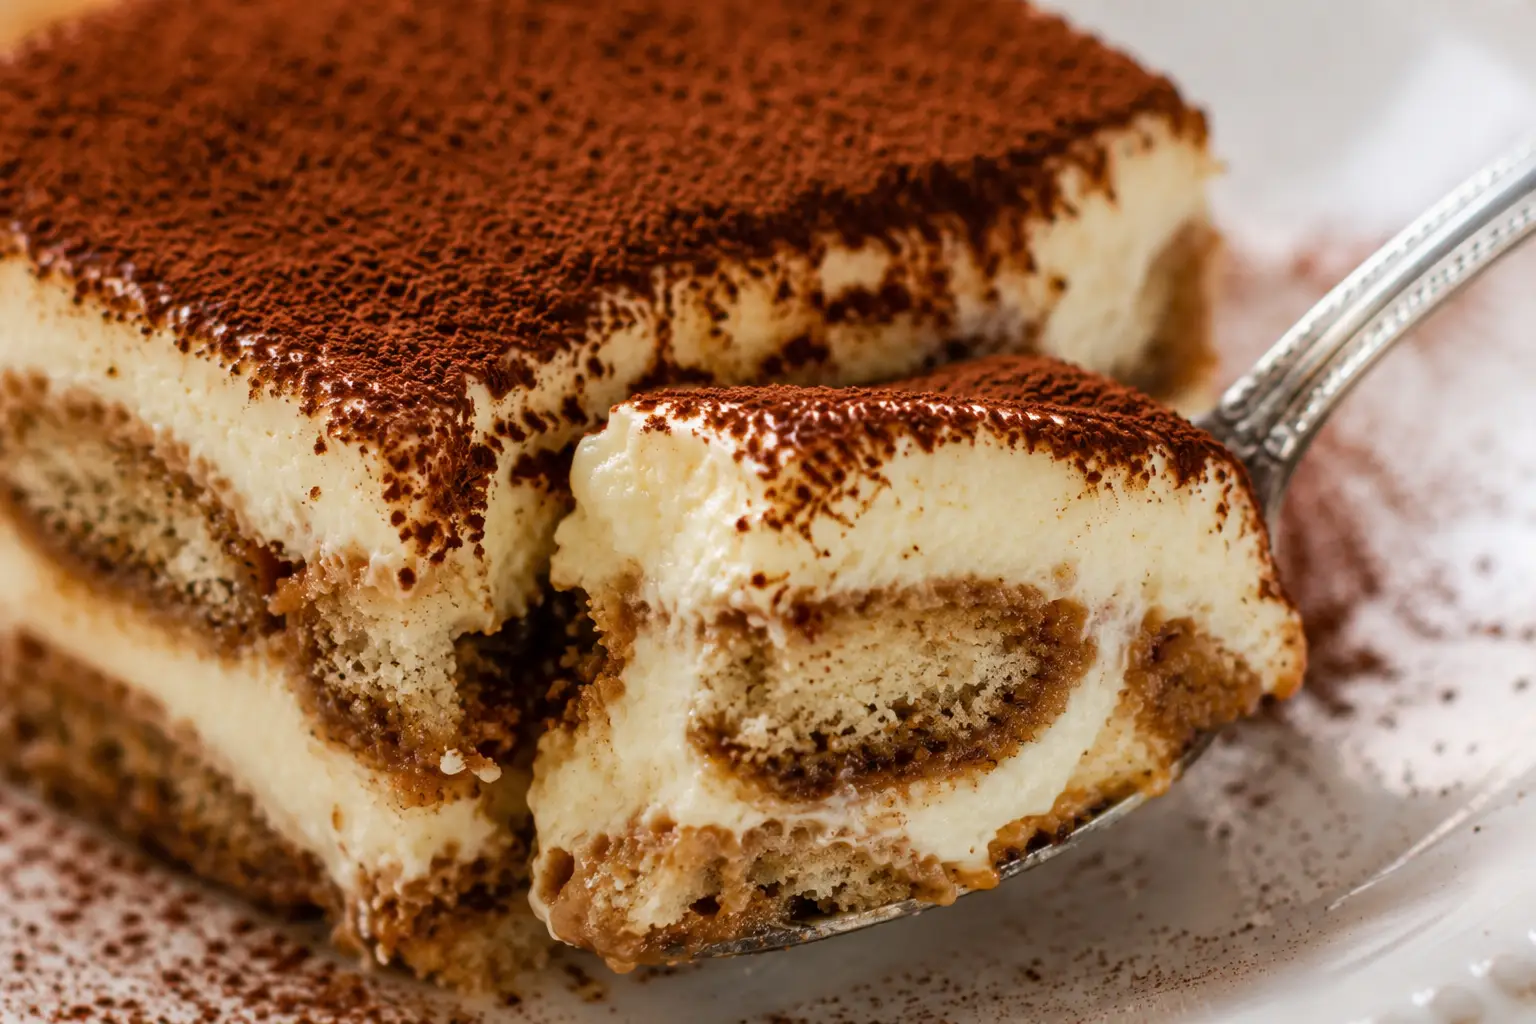
Why You’ll Love This Homemade Tiramisu Recipe
There are hundreds of tiramisu recipes online, but this version has been carefully tested to create the perfect balance of flavor and texture.
Here’s why you’ll love it:
- No baking required
- Thick, creamy mascarpone filling
- Rich espresso flavor without bitterness
- Beautiful bakery-style layers
- Easy enough for beginners
- Make-ahead friendly
- Perfect for holidays and entertaining
- Authentic Italian-inspired flavor
- Uses simple grocery store ingredients
- Better after chilling overnight
- Light and airy without being overly sweet
- Slices beautifully for serving
Best of all, every bite tastes like it came from your favorite Italian café.
What Is Tiramisu?
Tiramisu is one of Italy’s most beloved desserts.
The name literally translates to “pick me up,” referring to the energizing combination of espresso and cocoa.
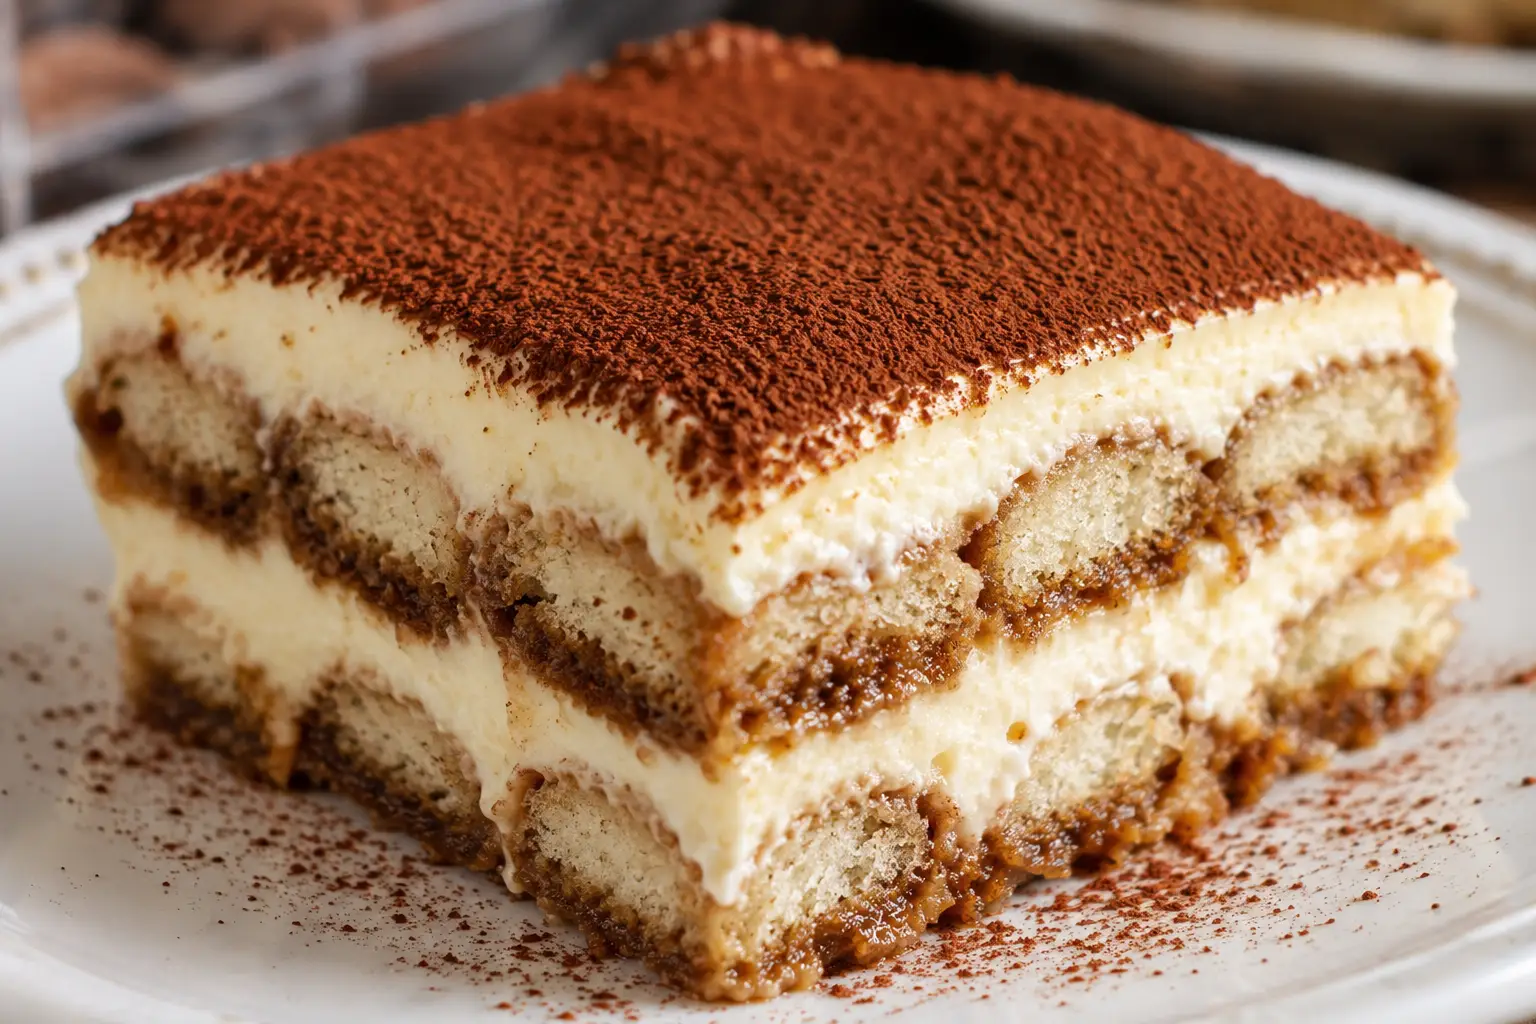
Traditional tiramisu is made by layering espresso-soaked ladyfinger cookies (Savoiardi) with a rich mascarpone cream before finishing everything with a generous dusting of cocoa powder.
Unlike cheesecake or mousse, tiramisu doesn’t require baking.
Instead, time does the work.
As the dessert chills, the layers soften together into an incredibly creamy dessert that slices beautifully while still remaining wonderfully light.
The result is somewhere between a mousse, a cake, and a custard—all wrapped into one unforgettable dessert.
Why This Is the Best Tiramisu Recipe
Making tiramisu isn’t difficult, but small details make a huge difference.
Many recipes end up with:
- watery filling
- grainy mascarpone
- soggy ladyfingers
- bland coffee flavor
- overly sweet cream
This recipe avoids all of those common problems.
Instead, you’ll get:
✔ Rich espresso flavor
✔ Thick mascarpone cream
✔ Soft—but never soggy—ladyfingers
✔ Balanced sweetness
✔ Beautiful defined layers
✔ A creamy texture that melts in your mouth
Ingredient Science: Why Every Ingredient Matters
One of the reasons this dessert tastes so luxurious is that every ingredient plays an important role.
Let’s break them down.
Mascarpone is the heart of tiramisu.
Unlike cream cheese, mascarpone has a much higher butterfat content, making it incredibly rich and smooth.
Always use full-fat mascarpone.
Reduced-fat versions contain more water, which can make the filling loose.
Pro Tip
Let mascarpone sit at room temperature for about 15–20 minutes before mixing.
Cold mascarpone can become lumpy when overmixed.
Heavy cream creates the airy texture that makes every bite feel light despite the richness.
Whipping the cream to medium-stiff peaks adds structure while keeping the filling soft.
Avoid overwhipping.
Butter starts forming sooner than most people realize.
Ladyfingers (Savoiardi) are crisp sponge cookies designed specifically for soaking liquids.
They’re not meant to stay crunchy.
Instead, they soften just enough to become cake-like after chilling.
Authentic Italian ladyfingers are much firmer than soft sponge cake fingers, making them ideal for tiramisu.
Espresso gives tiramisu its signature flavor.
Strong coffee works well too, but espresso creates deeper complexity.
Allow the coffee to cool completely before dipping the ladyfingers.
Hot coffee causes them to absorb too much liquid.
Unsweetened cocoa powder balances the sweetness of the mascarpone filling.
Dutch-process cocoa creates a smoother chocolate finish.
Natural cocoa offers a slightly brighter chocolate flavor.
Both work beautifully.
Although traditional Italian recipes sometimes skip vanilla, adding pure vanilla enhances the creamy richness without overpowering the espresso.
Sugar sweetens the filling while helping stabilize whipped eggs or whipped cream, depending on the method used.
The goal is balance.
Good tiramisu should never taste sugary.
Ingredients You’ll Need
For the Espresso Mixture:
- Freshly Brewed Espresso or Very Strong Coffee (2 cups), cooled completely: The backbone of the tiramisu flavor. Brew it fresh and allow it to cool completely before dipping. Hot coffee causes the ladyfingers to absorb too much liquid at once and become soggy.
- Coffee Liqueur (2 tablespoons, optional): Stirred into the cooled espresso for a more complex, boozy depth. Completely optional — the tiramisu is excellent without it.
- Vanilla Extract (1 teaspoon): Added to the espresso mixture for a warm, rounded flavor that softens the bitterness of the coffee.
For the Mascarpone Filling:
- Full-Fat Mascarpone Cheese (16 ounces), slightly softened: The heart of the tiramisu. Always use full-fat — reduced-fat mascarpone contains more water and produces a loose, runny filling. Let it sit at room temperature for 15 to 20 minutes before mixing. Cold mascarpone can become lumpy when overmixed.
- Heavy Whipping Cream (2 cups), cold: Whipped to medium-stiff peaks and folded into the mascarpone in three additions to create the airy, cloud-like filling. Use it cold straight from the fridge for the best whip.
- Granulated Sugar (3/4 cup): Sweetens the filling. The goal is balance — good tiramisu should never taste sugary.
- Vanilla Extract (2 teaspoons): Adds warmth and depth to the mascarpone filling. Vanilla bean paste works here as well.
- Salt (1/4 teaspoon): Balances the sweetness and keeps the filling from tasting flat.
For the Layers:
- Italian Savoiardi Ladyfingers (2 packages, approximately 14 ounces): Authentic Italian savoiardi are much firmer and crispier than soft sponge cake fingers, which makes them ideal for tiramisu. They soften to a cake-like texture after chilling without falling apart. Do not substitute soft ladyfingers.
For the Topping:
- Cocoa Powder (3 tablespoons): Dutch-process cocoa creates a smoother, darker finish. Natural cocoa offers a slightly brighter chocolate flavor. Dust generously through a fine mesh sieve immediately before serving for the freshest presentation.
- Dark Chocolate Curls (optional): A finishing garnish for a bakery-style presentation.
- Chocolate-Covered Espresso Beans (optional): Add a visual element and a hit of espresso flavor on top.
Kitchen Tools You’ll Need
Fortunately, tiramisu requires very little equipment.
You’ll need:
- 9×13-inch baking dish
- Stand mixer or hand mixer
- Large mixing bowls
- Rubber spatula
- Fine mesh sieve
- Offset spatula
- Small shallow bowl for espresso
- Measuring cups
- Kitchen scale (recommended)
Ingredient Substitutions
Need to make a few swaps?
Here are the best options.
No Espresso?
Use:
- strong brewed coffee
- instant espresso
- cold brew concentrate
No Coffee Liqueur?
Simply omit it.
The tiramisu is still delicious.
Or replace with:
- vanilla extract
- almond extract (small amount)
Alcohol-Free Tiramisu
Completely skip the liqueur.
No other changes are necessary.
Different Cocoa Powder
Natural cocoa
OR
Dutch cocoa
Both work wonderfully.
How to Make Homemade Tiramisu
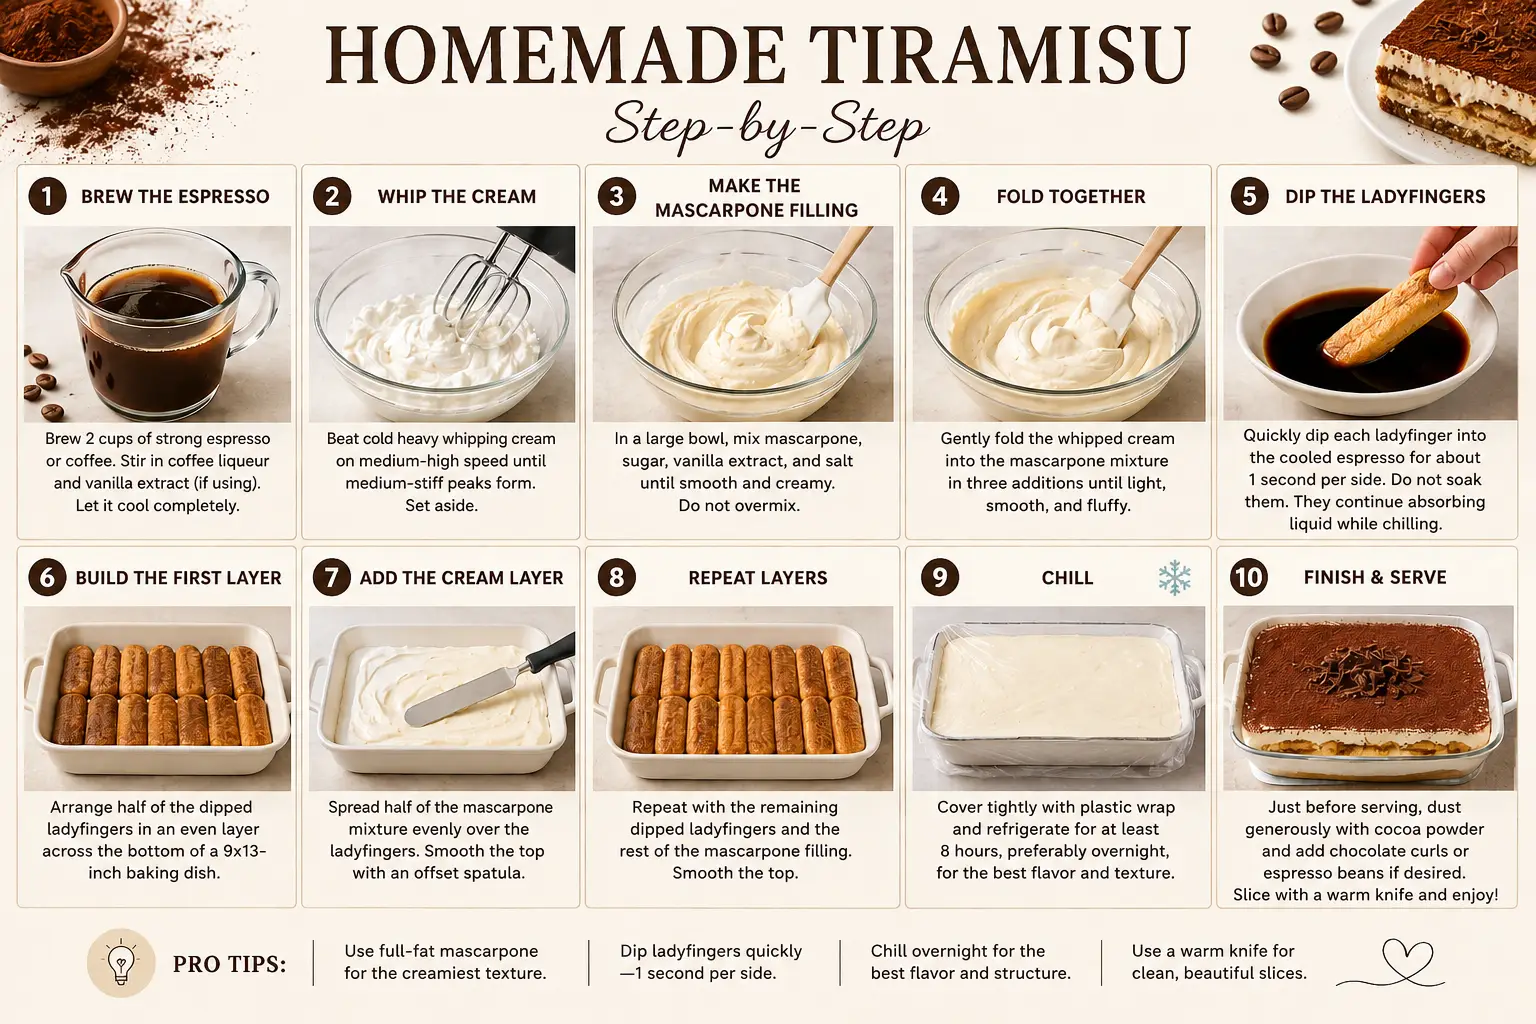
- Step 1: Brew the Espresso
Prepare strong espresso and allow it to cool completely.
Never dip ladyfingers into warm coffee.
Warm liquid causes them to absorb too much moisture too quickly.
Professional Tip:
Chill the espresso in the refrigerator while preparing the filling.
- Step 2: Prepare the Mascarpone Filling
In a large bowl, whip the heavy cream until medium-stiff peaks form.
Set aside.
In another bowl, combine mascarpone, sugar, vanilla, and a pinch of salt.
Mix only until smooth.
Do not overmix.
Fold the whipped cream into the mascarpone mixture in three additions using a rubber spatula.
Take your time.
The goal is to preserve as much air as possible.
The filling should look silky, fluffy, and luxurious.
Not runny.
Not stiff.
Think cloud-like.
- Step 3: Dip the Ladyfingers
This is where many homemade tiramisu recipes go wrong.
Each ladyfinger only needs about one second per side.
That’s it.
They continue absorbing liquid as the dessert chills.
If they’re completely soaked before layering, they’ll eventually become mush.
A quick dip creates the perfect cake-like texture later.
- Step 4: Build the First Layer
Arrange the dipped ladyfingers in a single even layer across the bottom of the dish.
Don’t leave large gaps.
Break a few cookies if necessary to fill corners.
An even base creates cleaner slices later.
- Step 5: Spread Half the Filling
Add half of the mascarpone mixture.
Spread gently using an offset spatula.
Avoid pressing downward.
You’re trying to preserve the fluffy texture.
Smooth the top evenly.
- Step 6: Repeat the Layers
Add another layer of dipped ladyfingers.
Top with the remaining mascarpone cream.
Smooth the surface until perfectly level.
Professional bakers often tap the dish gently on the counter once or twice to settle any hidden air pockets without deflating the cream.
Cover tightly.
Refrigerate for at least 8 hours.
Overnight is even better.
This waiting period transforms the dessert.
The flavors meld together, the cream sets beautifully, and the ladyfingers soften into tender, cake-like layers.
Patience is one of the most important ingredients in exceptional tiramisu.
Expert Tips for the Best Homemade Tiramisu
- Cool the Espresso Completely: Hot or even warm espresso causes the ladyfingers to absorb too much liquid immediately and turn mushy after chilling. Always cool in the fridge before dipping.
- One Second Per Side, No More: The single most common tiramisu mistake is over-soaking the ladyfingers. One second per side. They continue absorbing moisture from the mascarpone filling for hours as the dessert chills.
- Do Not Overmix the Mascarpone: Mix the mascarpone only until smooth. Overworking mascarpone can cause it to break and turn grainy, ruining the filling’s texture.
- Fold, Do Not Stir: Folding the whipped cream into the mascarpone preserves the air you worked to build into the cream. Stirring deflates it and produces a denser, heavier filling.
- Overnight Chilling is Non-Negotiable for the Best Result: Eight hours is the minimum. Overnight produces the cleanest slices, the most defined layers, and the deepest espresso flavor throughout.
- Dust Cocoa Right Before Serving: Cocoa powder absorbs moisture and darkens as it sits. Always dust immediately before serving for the freshest, most attractive presentation.
Common Mistakes to Avoid
Even though tiramisu is considered beginner-friendly, a few common mistakes can affect the final texture.
Avoid these pitfalls:
- Over-soaking the ladyfingers
- Mixing mascarpone straight from the refrigerator until it curdles
- Overwhipping the cream
- Using low-fat mascarpone
- Skipping the chill time
- Using weak coffee
- Adding too much sugar
- Spreading the filling too aggressively and deflating the whipped cream
- Forgetting to level the layers
- Dusting cocoa too early, causing it to absorb moisture and darken unevenly
Following these simple tips will reward you with a tiramisu that looks elegant, slices beautifully, and tastes every bit as luxurious as one served in a fine Italian restaurant.
Tiramisu Variations You’ll Love
One of my favorite things about tiramisu is how incredibly versatile it is. Once you’ve mastered the classic version, it’s easy to customize the flavors while keeping the same creamy texture everyone loves.
Whether you’re making dessert for the holidays, celebrating a birthday, or simply using ingredients you already have at home, these variations are every bit as delicious.
Classic Italian Tiramisu
If you’re looking for the most authentic flavor, stick with the traditional combination of:
- Espresso
- Mascarpone cheese
- Savoiardi ladyfingers
- Unsweetened cocoa powder
Sometimes, the simplest desserts are the most memorable.
Chocolate Tiramisu
Chocolate lovers can take this recipe to another level by adding finely grated dark chocolate between each layer.
You can also fold a few tablespoons of cocoa powder into the mascarpone filling for a richer chocolate flavor.
Finish with chocolate curls for an elegant presentation.
Nutella Tiramisu
Spread a thin layer of Nutella over the ladyfingers before adding the mascarpone filling.
The hazelnut and espresso combination is absolutely irresistible.
Strawberry Tiramisu
Replace the espresso with a homemade strawberry syrup and layer sliced fresh strawberries between each layer.
It’s the perfect spring and summer dessert.
Lemon Tiramisu
Swap the coffee for fresh lemon syrup and add lemon zest to the mascarpone filling.
This version is bright, fresh, and surprisingly light.
Pumpkin Tiramisu
Fold pumpkin puree, cinnamon, nutmeg, ginger, and cloves into the mascarpone filling for a cozy fall-inspired dessert.
It’s a beautiful alternative to pumpkin pie during the holidays.
Salted Caramel Tiramisu
Drizzle homemade salted caramel between each layer before chilling.
Top with flaky sea salt for a sweet-and-salty finish.
Mocha Tiramisu
Mix melted dark chocolate into the espresso before dipping the ladyfingers.
Every bite tastes like your favorite coffeehouse mocha.
Serving Suggestions
This elegant dessert pairs beautifully with so many occasions.
Serve it after:
It also pairs beautifully with:
- Fresh berries
- Espresso
- Cappuccino
- Latte
- Hot chocolate
- Dessert wine
Before You Go
There are good desserts…
…and then there are desserts people remember.
This homemade tiramisu is one of those recipes that turns ordinary dinners into celebrations and holidays into unforgettable memories.
It’s rich without feeling heavy.
Elegant without being difficult.
Simple enough for beginners yet impressive enough for special occasions.
Whether you’re making your very first tiramisu or adding another favorite to your dessert collection, I hope this recipe becomes one you reach for again and again.
After one bite of the silky mascarpone filling layered with espresso-soaked ladyfingers and finished with rich cocoa powder, you’ll understand exactly why tiramisu has remained one of Italy’s most iconic desserts for generations.
If you make this recipe, I’d love to hear how it turned out! Leave a comment below with your favorite variation, share your photos, and don’t forget to rate the recipe. Seeing your creations is always the sweetest part of sharing these recipes.
More Dessert Recipes You’ll Love
If you loved this homemade tiramisu recipe, be sure to check out these other reader-favorite desserts:
- 🍰 Chocolate Cheesecake – Rich, ultra-creamy, and topped with a silky chocolate ganache.
- 🍪 Oreo Cheesecake – Packed with Oreo cookies in every creamy bite.
- 🥜 Biscoff Cheesecake – A smooth cheesecake loaded with warm caramelized cookie butter flavor.
- 🎂 Classic Vanilla Cake – Soft, moist cake layers with fluffy vanilla buttercream, perfect for birthdays and celebrations.
- 🍫 Chocolate Cake – Deeply chocolatey, moist, and topped with luscious chocolate buttercream.
- 🍫 Homemade Brownies – Thick, fudgy brownies with crackly tops and rich chocolate flavor.
- 🧁 Blueberry Muffins – Bakery-style muffins bursting with juicy blueberries and tender crumb.
- 🍪 Chewy Sugar Cookies – Soft centers, buttery edges, and perfect for any occasion.
- 🥜 Bakery-Style Peanut Butter Cookies – Thick, chewy cookies packed with peanut butter flavor.
- 🥞 Fluffy Homemade Pancakes – Light, buttery pancakes that are perfect for breakfast or brunch.
Whether you’re baking for the holidays, a birthday celebration, or simply satisfying your sweet tooth, you’ll find plenty of easy, bakery-inspired recipes to make and share with family and friends.