Perfect Unicorn Cakes
Looking to make a show-stopping unicorn cake that’s as magical as it is delicious? Whether you’re baking for a birthday party, baby shower, or a just-because treat, my unicorn cake: step-by-step tips + best buttercream recipe has everything you need to know to create a Pinterest-worthy unicorn cake from start to finish.
From layering and crumb coating to colorful buttercream swirls and horn placement, you’ll get expert tips and a tried-and-true buttercream recipe that pipes like a dream. Find my Cake Baking 101: Tips for the Perfect Cake Every Time best cake prep practices here!
If you love fun baking projects like this, try this Cinnamon Roll Cake
Why You'll Love This Perfect Unicorn Cakes
- Perfect for birthdays and celebrations
- Visually stunning and fun to decorate
- Customizable colors and designs
- Beginner-friendly with simple techniques
- Great centerpiece dessert
For another baking project, try this Caramel Apple Pie
Key Ingredients You'll Need
- 2 sticks (1 cup) unsalted butter, softened
- 2 tbsp heavy whipping cream
- 3 ½ cups powdered sugar, sifted
- 1 tsp vanilla extract (or any extract of choice)
How to Make Perfect Unicorn Cakes
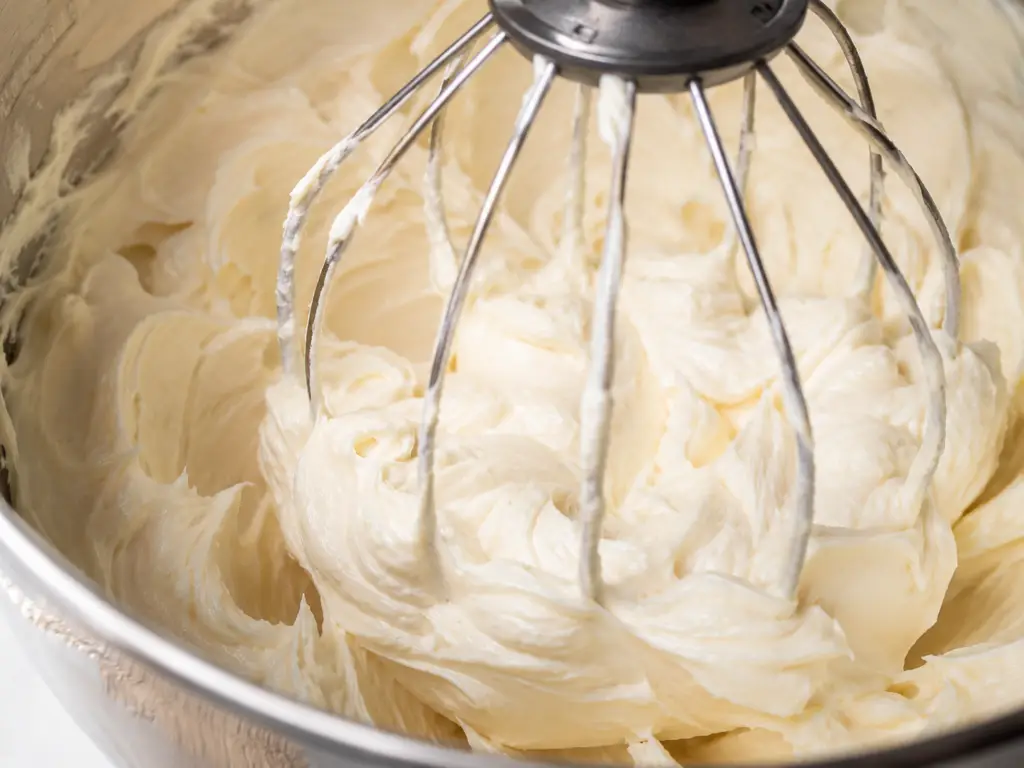
- Whip the butter on high for 5 minutes until pale and fluffy.
- Add the heavy cream and whip on high for 2–3 minutes until light and airy.
- Add the powdered sugar in 2 batches, mixing well and scraping the bowl between additions.
- Once incorporated, mix on low and add the vanilla extract.
- Continue mixing on low until smooth and creamy.
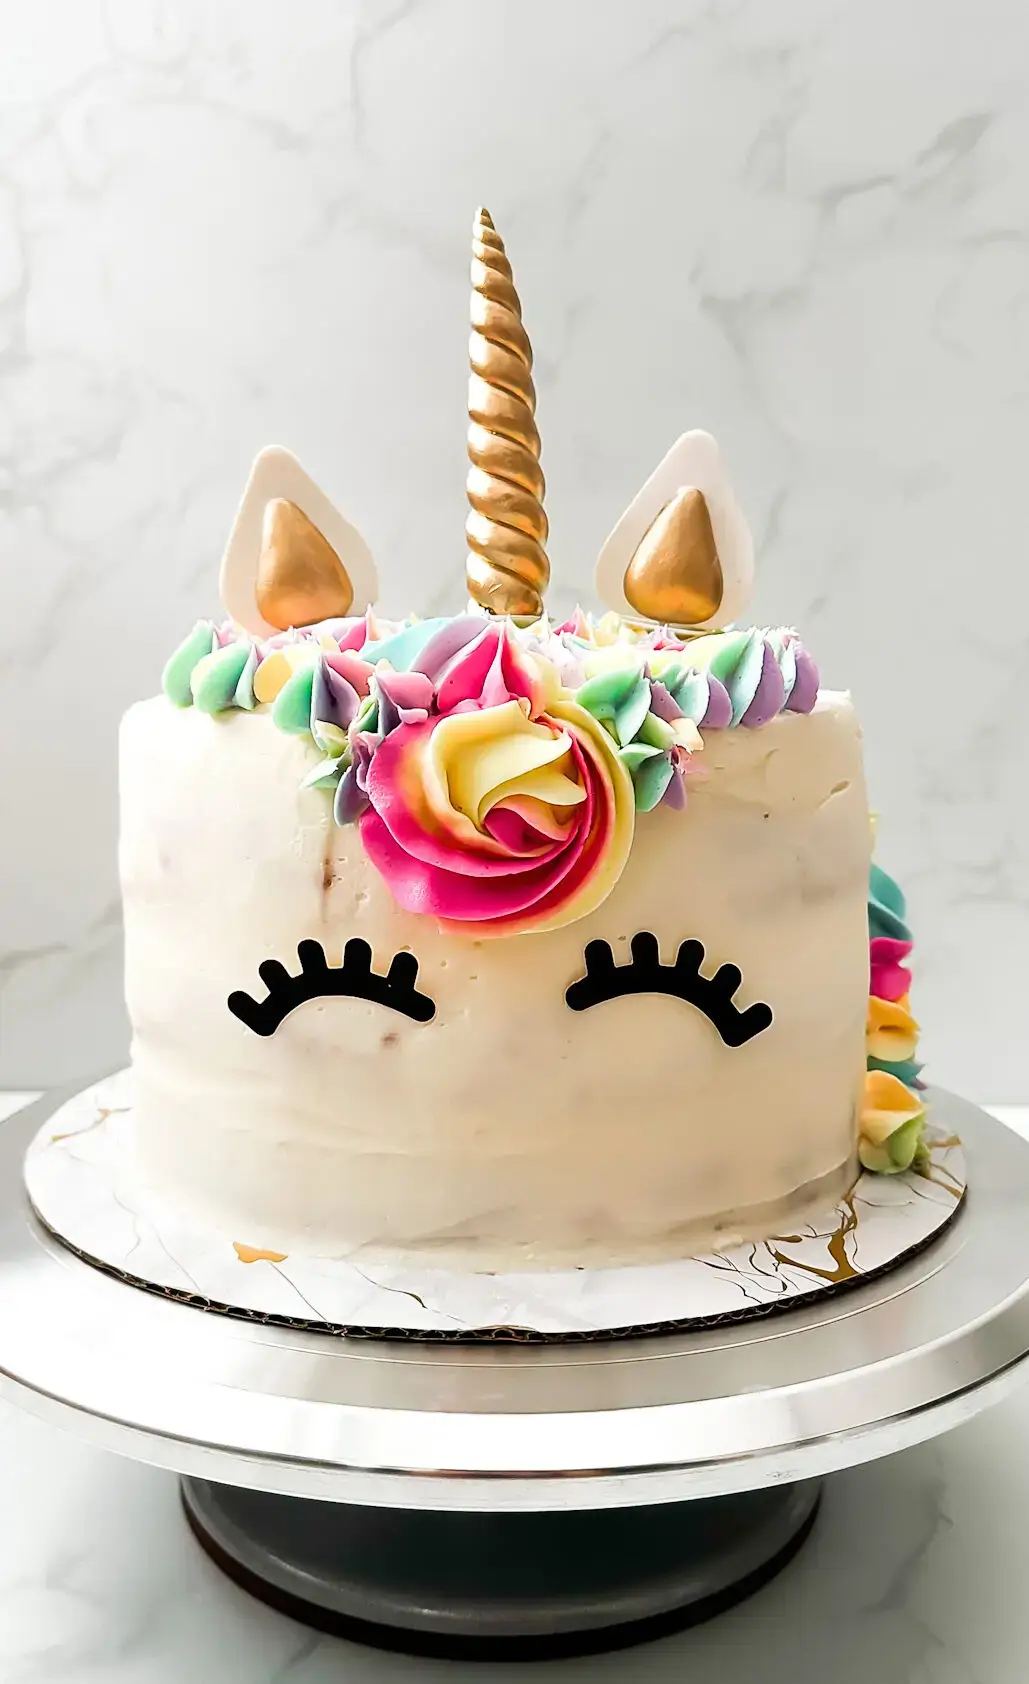
Start with the rosette in the front and work your way back distributing the rosettes and stars everywhere. Fill in with different colors and swirls.
For more easy recipe tutorials and expert baking tips, subscribe to Sugar Face Bakes on YouTube and join our growing community of home bakers!
Step-By-Step What You Need to Build a Unicorn Cake
Before diving into the step-by-step, here’s a quick list of what you’ll need:
- 2 or 3 baked cake layers, cooled
- Buttercream frosting (recipe below)
- Gel food coloring (in pastel or rainbow hues)
- Unicorn horn and ear decorations (fondant, paper, or plastic)
- 1M piping tip
- Piping bags and plastic wrap
- Offset spatula and cake scraper
- Cake board or stand
The Best Buttercream for Unicorn Cakes
This buttercream is stable for piping, creamy for frosting, and easy to tint in vibrant shades. Plus, it’s beginner-friendly and requires just a few ingredients.
How to Decorate Your Unicorn Cake
Now for the fun part—turning your cake into a unicorn!
Step-by-Step Unicorn Cake Decorating:
- Divide the buttercream evenly into separate bowls (based on how many colors you want).
- Use gel food coloring to tint each bowl a different color. Mix well.
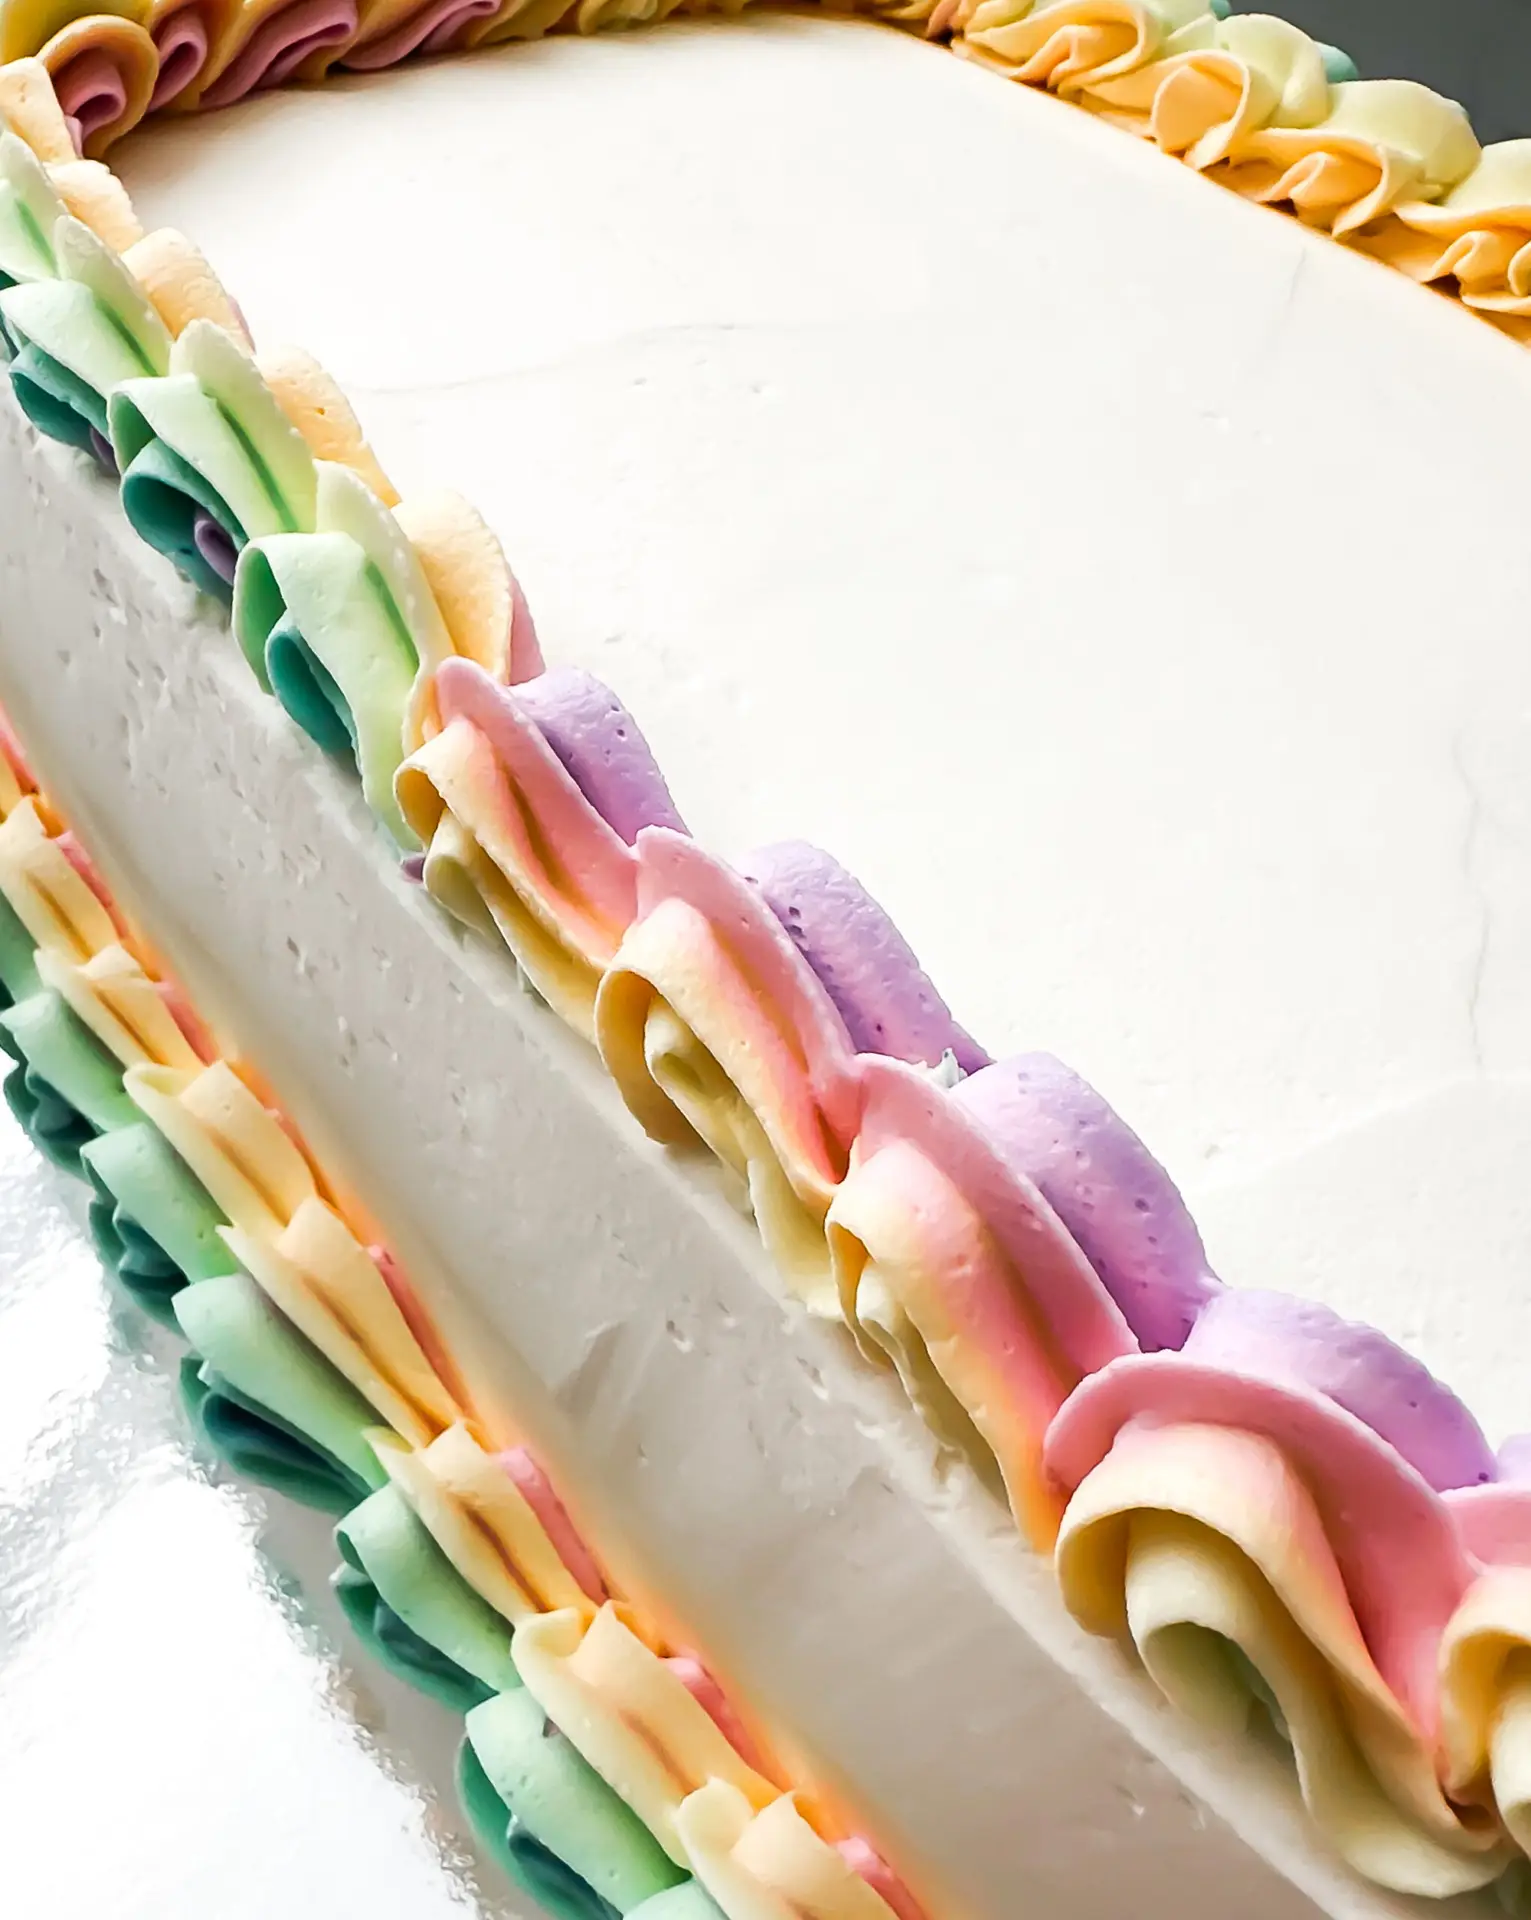
- On a sheet of plastic wrap, add a line of each color side-by-side to form a long strip.
- Fold the plastic wrap over to seal the colors, then roll it gently into a log and twist the ends closed.
- Cut one end of the plastic wrap just above the buttercream.
- Place the buttercream log into a piping bag fitted with a 1M star tip.
For decorating guidance, check out this Cake Baking Tips Guide
Stacie’s Tricks & Tips
- Use cake flour for lighter sponge layers
- Chill between steps to make frosting cleaner and easier
- Use gel color, not liquid – it won’t water down your frosting
- Decorate the day of the event for the freshest look
- Store in a cake box in the fridge if making ahead (bring to room temp before serving)
Creating a unicorn cake is easier than it looks—and with the right buttercream and a few key techniques, it’s a magical masterpiece in the making. Whether you’re a beginner or an experienced baker, this cake is guaranteed to wow any crowd.
So grab your piping bags, channel your inner cake artist, and bring your unicorn cake dreams to life!
For more baking help, explore
Try your skills with my foolproof rainbow frosting recipe and tutorial.
Come bake with me! Subscribe to my YouTube channel to get all my latest tips and recipe walk-throughs delivered right to your feed.
Frequently Asked Questions
What kind of cake is best for unicorn cakes?
Unicorn cakes work best with sturdy cake bases like vanilla, funfetti, or butter cake. These cakes hold their shape well during layering and decorating and support heavy buttercream designs.
Can I make unicorn cakes ahead of time?
Yes, unicorn cakes can be made 1–2 days in advance. Store the fully decorated cake in the refrigerator and bring it to room temperature for about 30–60 minutes before serving.
How long do unicorn cakes last in the fridge?
Unicorn cakes last up to 4 days in the refrigerator when stored in an airtight container. The buttercream helps keep the cake moist during storage.
Can I freeze unicorn cakes?
Yes, unicorn cakes can be frozen for up to 2 months. Freeze the cake before decorating for best results, then thaw overnight in the fridge before frosting and decorating.
Why is my unicorn cake buttercream not holding shape?
Unicorn cakes require stable buttercream, and it may not hold shape if it’s too warm or overmixed. Chill the frosting slightly and use more powdered sugar if needed to stiffen it.
More Dessert Recipes
Looking for more easy and comforting meals? Browse all recipes here:


- Start with the front of the cake and pipe a rose-shaped swirl using your 1M tip.
- Continue piping rosettes, stars, and swirls in a cascading pattern to the side and back of the cake to create the flowing unicorn mane.
- Insert your unicorn horn and ears at the top center of the cake.
- Optionally, add small piped rosettes around the base or eyes drawn with edible black marker or icing for extra detail.