Homemade Apple Pie
The ultimate homemade apple pie recipe with a buttery flaky crust, perfectly spiced apple filling, and foolproof tips for a pie that’s never runny. Whether you’re baking for Thanksgiving, Christmas, Sunday dinner, or simply because apple season has arrived, this classic apple pie recipe delivers bakery-quality results every single time.
The Best Homemade Apple Pie Recipe You’ll Ever Bake
There’s something magical about pulling a homemade apple pie from the oven. The golden, buttery crust crackles as it cools, cinnamon fills the kitchen, and sweet apples bubble beneath a beautifully flaky crust. Few desserts capture comfort quite like a classic apple pie.
After years of baking pies, I’ve learned that the difference between a good pie and an unforgettable one isn’t simply the recipe—it’s understanding the small details that create exceptional texture and flavor. Choosing the right combination of apples, balancing sweetness with acidity, properly thickening the filling, and baking long enough to caramelize the fruit all work together to create the perfect slice.
This recipe has been carefully developed to deliver everything you might be searching for in the best homemade apple pie recipe:
- Thick—not runny—apple filling
- Apples that stay tender without turning mushy
- Rich cinnamon flavor without overwhelming the fruit
- Perfectly flaky double crust
- Beautiful bakery-style presentation
- Easy enough for beginners
- Foolproof tips throughout
Whether this is your first pie or your hundredth, this recipe walks you through every step so you can bake with confidence.
Why You’ll Love This Homemade Apple Pie
There are thousands of apple pie recipes online, but this version focuses on what actually matters inside the finished pie.
✔ Perfectly sliceable filling
✔ Flaky buttery crust
✔ Apples that keep their shape
✔ Warm fall spices
✔ Easy-to-follow instructions
✔ Make-ahead friendly
✔ Freezer friendly
✔ Perfect for Thanksgiving, Christmas, family gatherings, and Sunday dinners
✔ Delicious served warm or cold
Best of all, this pie tastes even better the next day after the filling has had time to fully set.
What Makes This Apple Pie Better Than the Rest?
Many homemade pies suffer from one of three common problems:
- watery filling
- mushy apples
- soggy bottom crust
This recipe avoids all three by using a few professional baking techniques.
A Blend of Apples
Using only one variety often creates either mushy apples or apples that never soften.
Instead, we’ll use a blend of sweet and tart apples for the perfect balance of flavor and texture.
Great combinations include:
- Honeycrisp + Granny Smith
- Honeycrisp + Pink Lady
- Braeburn + Granny Smith
- Fuji + Granny Smith
- Cosmic Crisp + Honeycrisp
The tart apples provide structure while sweeter apples create natural caramel-like flavor.
Balanced Thickener
Too much flour creates a cloudy filling.
Too much cornstarch creates a gummy texture.
Using a carefully balanced combination creates a silky filling that slices beautifully.
Brown Sugar for Rich Flavor
Brown sugar melts into the apples and creates subtle caramel notes without making the pie overly sweet.
Combined with white sugar, it gives the filling incredible depth.
Fresh Lemon Juice
A little acidity brightens the apples while preventing the filling from tasting overly sweet.
It also helps preserve the apples’ fresh flavor during baking.
Plenty of Butter
Small pieces of butter melt into the filling while baking, creating a rich, silky sauce that coats every slice of apple.
A Brief History of Apple Pie
Although apple pie is often considered one of America’s most iconic desserts, its history actually stretches back hundreds of years.
The earliest recorded apple pie recipes appeared in England during the late 1300s. These early pies looked very different from the ones we enjoy today. They often included figs, raisins, pears, saffron, and little or no sugar because refined sugar was extremely expensive.
When European settlers arrived in North America, they brought pie-making traditions with them. Apples quickly became one of the easiest fruits to grow throughout the colonies, and pie became an everyday dessert rather than an occasional luxury.
As orchards expanded across the United States during the 1800s, apple pie became deeply woven into American culture. Families developed recipes passed from one generation to the next, each adding their own signature touches—extra cinnamon, different apple varieties, decorative lattice crusts, or secret spice blends.
The famous phrase “as American as apple pie” didn’t become popular until the 20th century, but the dessert had already become a symbol of home, family, and comfort.
Today, apple pie remains one of the most beloved desserts in American kitchens, appearing at everything from holiday dinners to summer picnics and neighborhood bake sales.
The Secret to the Best Apple Pie
If you’ve ever wondered why bakery pies taste richer than homemade versions, the answer isn’t expensive ingredients.
It’s technique.
Professional bakers focus on five things:
1. The Right Apples
Not all apples are meant for baking.
Some completely disappear during baking while others remain unpleasantly firm.
Choosing apples that hold their shape is one of the biggest secrets to success.
2. Evenly Sliced Apples
Aim for slices about ¼-inch thick.
Thin slices become mushy.
Thick slices don’t soften enough.
Consistent thickness ensures every bite bakes evenly.
3. Proper Thickening
As apples bake, they release a tremendous amount of juice.
Without enough thickener, the filling becomes watery.
Too much thickener, however, leaves the filling gluey.
Finding the perfect balance is what creates those beautiful bakery slices.
4. High Heat First
Beginning the bake at a higher temperature helps set the crust before the filling releases too much liquid.
This helps reduce soggy bottoms.
5. Cooling Completely
This is perhaps the hardest step—but also the most important.
Fresh from the oven, the filling is still bubbling and extremely loose.
Allowing the pie to cool for at least four hours gives the juices time to thicken naturally.
Cutting too early is the number one reason homemade pies appear runny.
The Best Apples for Apple Pie
Choosing the right apples makes a tremendous difference.
Here are some of the best baking varieties.
Honeycrisp
One of the most popular choices thanks to its sweet flavor and crisp texture.
Great for mixing with tart apples.
Granny Smith
Bright, tart, and extremely firm.
These apples hold their shape beautifully and balance sweeter varieties.
Pink Lady
Sweet with just enough tartness.
Excellent texture after baking.
Braeburn
Complex flavor with notes of spice.
Wonderful in homemade pies.
Cosmic Crisp
Naturally juicy with excellent baking texture.
A newer favorite among home bakers.
Fuji
Sweet and crisp.
Best when paired with Granny Smith for balance.
Apples to Avoid
Some apples soften far too much during baking.
These include:
- Red Delicious
- McIntosh
- Gala (unless mixed with firmer apples)
- Cortland
While delicious for snacking, they can create a mushy filling.
Ingredients You’ll Need
Every ingredient serves a purpose.
Apples
The star of the recipe.
Using about 3 pounds creates a generously filled pie that doesn’t shrink dramatically during baking.
Brown Sugar
Adds caramel flavor and richness.
Granulated Sugar
Balances sweetness without overpowering the fruit.
Cinnamon
The classic apple pie spice.
Warm, cozy, and essential.
Nutmeg
Adds subtle warmth and depth.
A little goes a long way.
Optional Cardamom
Just a tiny pinch creates incredible complexity without making the pie taste unusual.
Most guests won’t identify it—but they’ll notice something special.
Lemon Juice
Brightens the filling.
Balances sweetness.
Helps maintain fresh apple flavor.
Lemon Zest
Optional but highly recommended.
It adds freshness that complements the cinnamon beautifully.
Cornstarch
Creates a glossy filling.
Flour
Works alongside the cornstarch to create a filling that’s stable yet silky.
Unsalted Butter
Richness.
Flavor.
A beautiful buttery finish.
Vanilla Extract
Rounds out all the warm spices.
Just enough to enhance the apples without becoming noticeable.
Double Pie Crust
Homemade or store-bought both work beautifully.
If making homemade, chilling the dough thoroughly before rolling is essential for maximum flakiness.
Equipment You’ll Need
You don’t need specialty equipment to make an incredible apple pie.
Having these kitchen tools simply makes the process easier.
- 9-inch deep dish pie plate
- Large mixing bowl
- Vegetable peeler
- Sharp chef’s knife
- Cutting board
- Measuring cups and spoons
- Citrus juicer
- Pastry brush
- Baking sheet (to catch any drips)
- Aluminum foil or pie shield for protecting crust edges
- Cooling rack
Pro Tips for Bakery-Style Apple Pie
Use Cold Pie Dough
Cold butter creates steam pockets during baking.
Those steam pockets become flaky layers.
If the dough becomes soft while working, refrigerate it for 15–20 minutes before continuing.
Don’t Skip the Egg Wash
A simple egg wash gives the crust its gorgeous golden color while adding a beautiful bakery-style shine.
Sprinkle with coarse sugar before baking for an extra-special finish.
Vent the Top Crust
Steam must escape during baking.
Whether using a lattice crust or simple slits, proper venting prevents bursting and helps the filling thicken evenly.
Bake on a Sheet Pan
Apple pie filling can bubble over.
Placing the pie on a baking sheet keeps your oven clean and makes removing the hot pie much easier.
Let the Pie Rest
It bears repeating because it’s so important.
Cooling completely allows the starches to finish thickening the filling.
Patience rewards you with perfect slices instead of apple soup.
Common Apple Pie Mistakes (and How to Avoid Them)
Even experienced bakers can run into a few common pie problems. Fortunately, they’re easy to prevent once you know what to look for.
Using only one type of apple: Combining sweet and tart varieties creates a more complex flavor and better texture.
Packing too many apples into the pie: While a full pie is beautiful, overfilling can cause the crust to split or the filling to overflow excessively.
Skipping the thickener: Apples release a surprising amount of liquid during baking. The right balance of cornstarch and flour keeps the filling luscious instead of watery.
Underbaking the pie: A beautifully browned crust doesn’t always mean the apples are fully cooked. The filling should be visibly bubbling through the vents before the pie comes out of the oven.
Slicing too soon: This is the most common mistake. Allowing the pie to cool fully is essential for clean, picture-perfect slices.
By avoiding these simple pitfalls, you’ll be rewarded with a pie that looks as beautiful as it tastes.
How to Make the Best Homemade Apple Pie
This homemade apple pie comes together in a few simple steps. Taking your time with each stage ensures a flaky crust, perfectly tender apples, and a filling that slices beautifully every time.
Step 1: Prepare the Apples
Wash, peel, and core the apples before slicing them into even ¼-inch slices.
Keeping the slices uniform ensures they bake evenly so you don’t end up with some apples that are mushy while others remain crisp.
Place the sliced apples into a very large mixing bowl.
Step 2: Mix the Filling
To the apples, add:
- Granulated sugar
- Brown sugar
- Ground cinnamon
- Freshly grated nutmeg
- Optional pinch of cardamom
- Cornstarch
- All-purpose flour
- Lemon juice
- Lemon zest
- Vanilla extract
Gently toss everything together until every apple slice is evenly coated.
Allow the mixture to rest for about 15–20 minutes.
This resting period helps the apples release some of their juices, allowing the sugar and spices to begin creating the delicious syrup that develops while baking.
Step 3: Prepare the Pie Crust
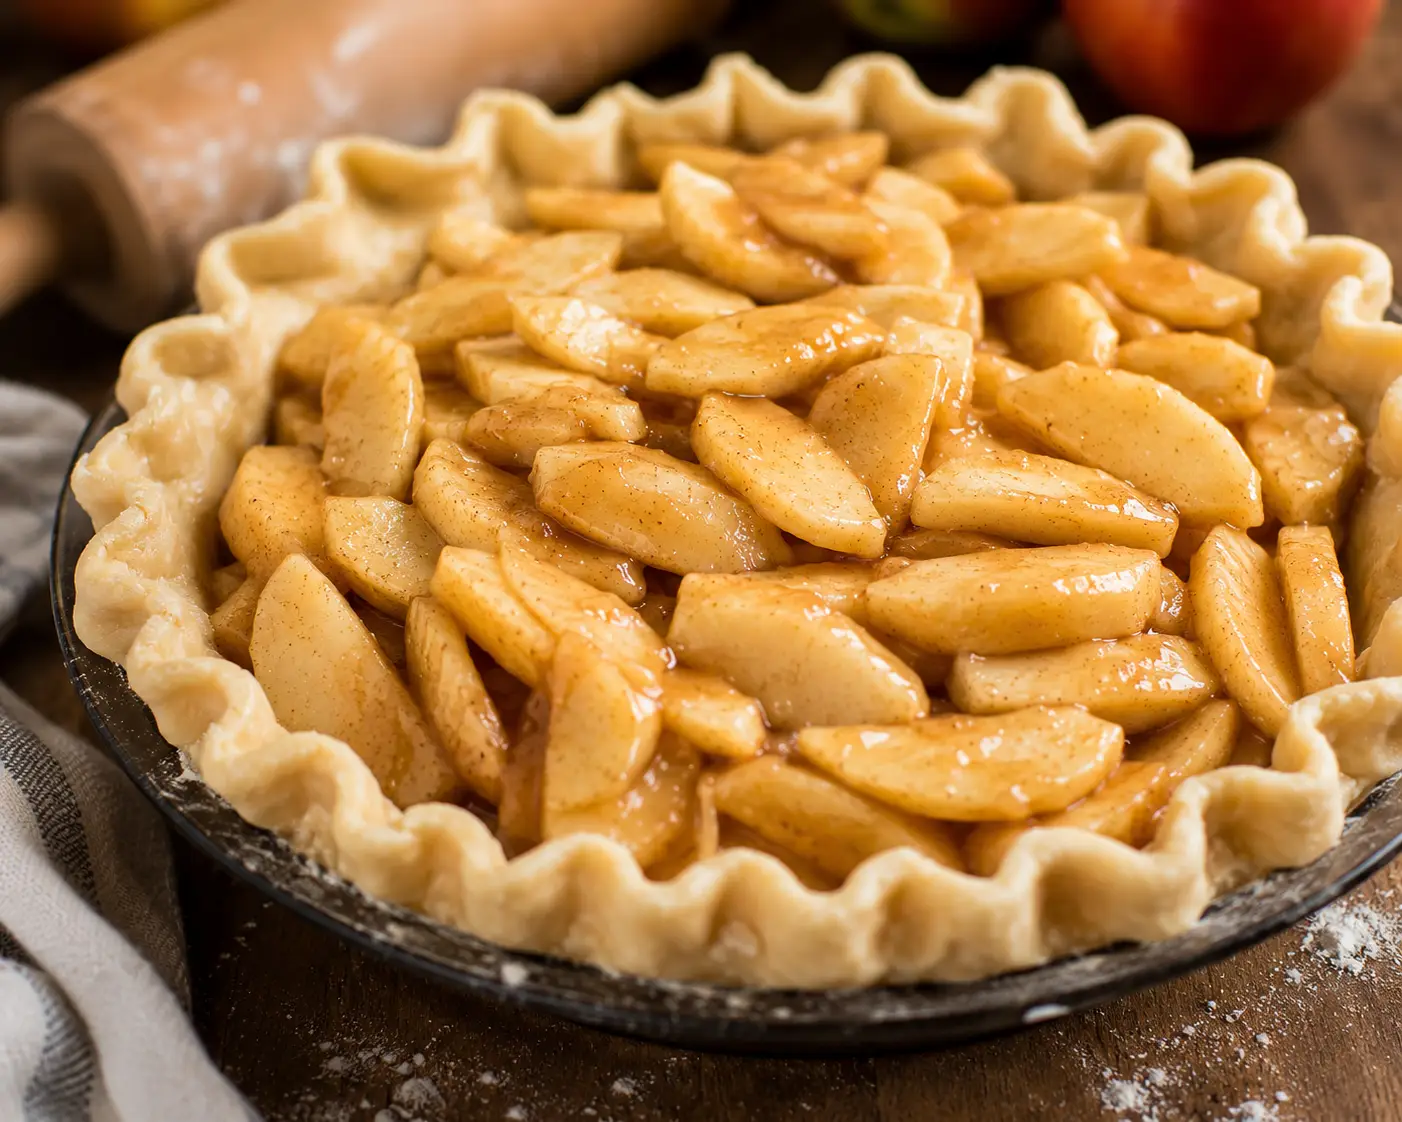
Roll one pie crust into a circle approximately 12 inches in diameter.
Carefully transfer it into a deep 9-inch pie plate.
Allow the excess dough to hang over the edges without trimming yet.
If the crust becomes soft while working, place the pie plate into the refrigerator for 10–15 minutes before filling.
Cold dough creates the flakiest crust.
Step 4: Fill the Pie
Using a slotted spoon, mound the apples into the prepared crust.
Then pour any remaining juices evenly over the top.
Dot the filling with small cubes of cold butter.
As the butter melts, it combines with the apple juices to create an incredibly silky filling.
Step 5: Add the Top Crust
Roll out the second crust.
You have several beautiful options:
- Full traditional crust
- Lattice crust
- Decorative braided crust
- Cookie cutter leaf designs
- Rustic open lattice
If using a full crust, cut 5–6 small vents in the center to allow steam to escape.
Trim excess dough, leaving about 1 inch around the edge.
Fold underneath itself and crimp using your fingers or the tines of a fork.
Step 6: Brush with Egg Wash
Whisk together:
- 1 egg
- 1 tablespoon milk or heavy cream
Brush over the entire top crust.
Sprinkle generously with coarse sanding sugar for an irresistible bakery-style finish.
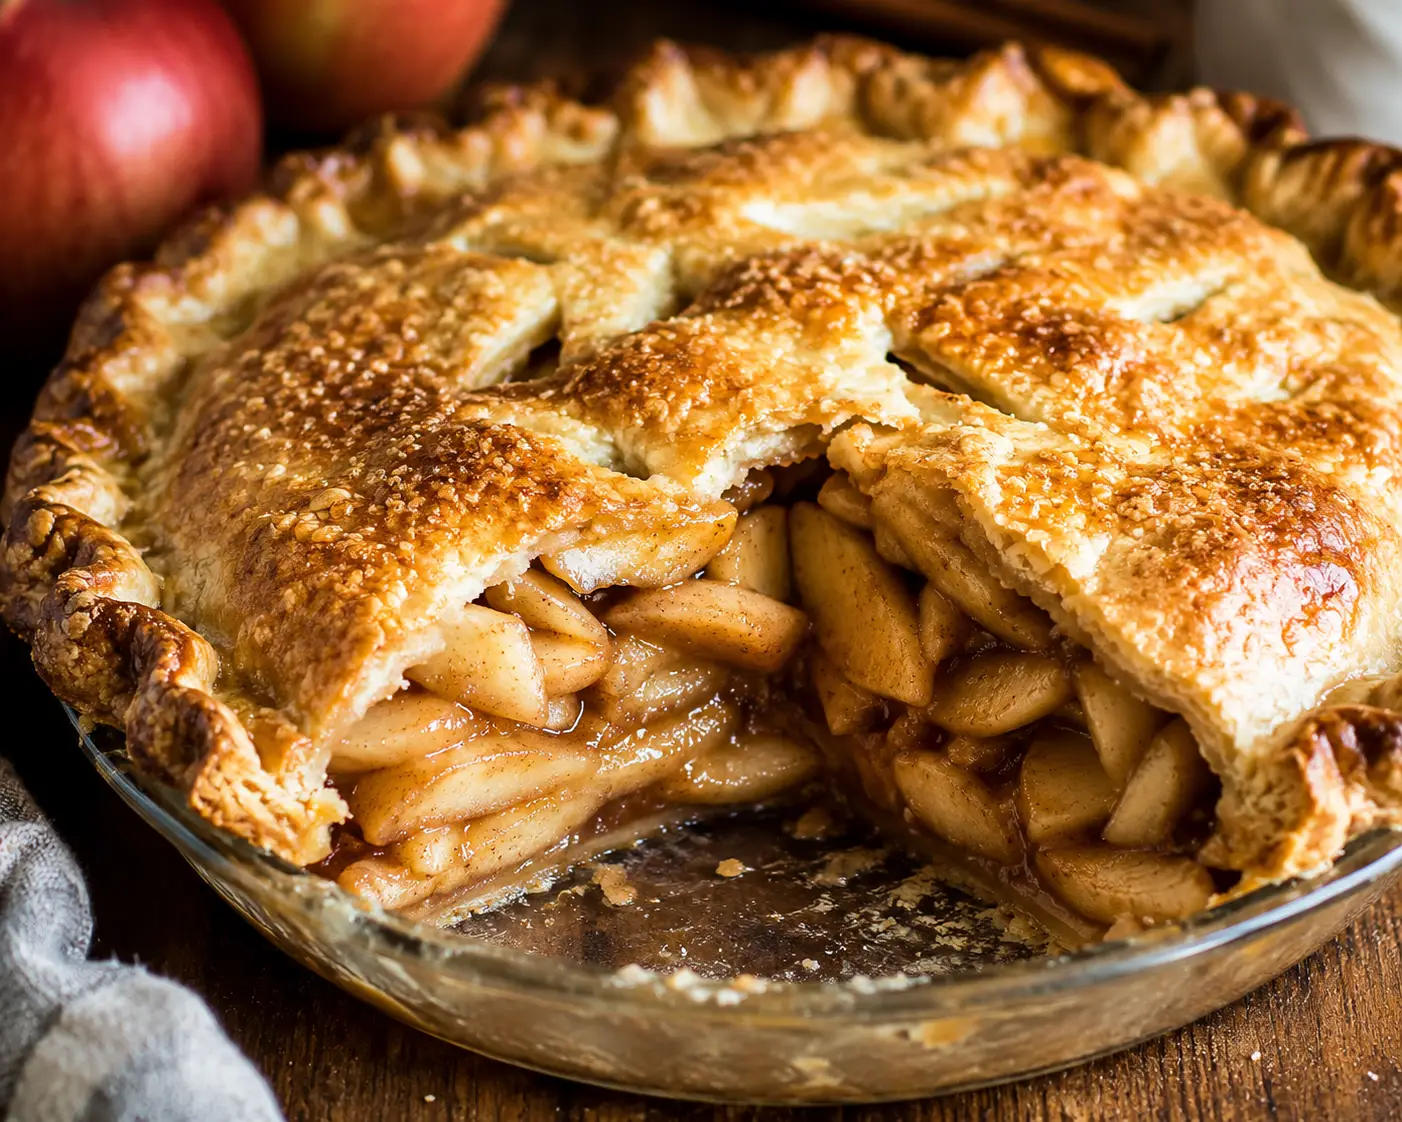
Step 7: Bake
Place the pie onto a rimmed baking sheet.
Bake at 425°F for 20 minutes.
Without opening the oven, reduce the temperature to 375°F and continue baking for 40–50 minutes, or until:
- The crust is deep golden brown
- The filling is bubbling through the vents
- The apples are fork tender
If the crust browns too quickly, loosely cover the edges with foil or use a pie shield during the final 20–30 minutes.
Step 8: Cool Completely
Transfer the pie to a cooling rack.
Allow it to cool for at least 4 hours before slicing.
Yes—it requires patience.
But this one step is what transforms a loose filling into perfectly clean slices.
Expert Tips for Perfect Apple Pie Every Time
These little tricks make a surprisingly big difference.
Mix Apple Varieties
Using only sweet apples often produces a flat flavor.
Combining tart and sweet apples creates a much more complex filling.
One of my favorite combinations is:
- Honeycrisp
- Granny Smith
- Pink Lady
The balance is nearly perfect.
Don’t Over-Spice
Apple pie should taste like apples first.
The spices should complement—not overpower—the fruit.
Too much cinnamon can actually make the filling taste bitter.
Keep Everything Cold
Cold butter.
Cold crust.
Cold pie plate if possible.
Warm dough causes butter to melt before baking, resulting in less flaky pastry.
Bake Until the Filling Bubbles
Many pies are removed from the oven too early.
If the filling isn’t actively bubbling, the starch hasn’t fully activated.
That means the filling may remain runny after cooling.
Wait until you see thick bubbling through the vents.
Let Gravity Help
When adding apples to the crust, mound them slightly higher in the center.
They’ll naturally settle while baking.
This creates the beautiful domed appearance seen in bakery pies.
Variations
One recipe can create several delicious versions.
Dutch Apple Pie
Replace the top crust with a buttery crumb topping made from:
- Flour
- Brown sugar
- Butter
- Cinnamon
- Oats (optional)
Salted Caramel Apple Pie
Drizzle homemade salted caramel between the apple layers before adding the top crust.
Serve with additional caramel sauce after baking.
Apple Cranberry Pie
Add one cup fresh cranberries for tart bursts of flavor that pair beautifully with holiday meals.
Apple Pear Pie
Replace two apples with ripe pears for a softer, sweeter filling.
Bourbon Apple Pie
Add one tablespoon bourbon to the filling for a subtle caramel warmth.
The alcohol bakes off while leaving incredible flavor.
Streusel Apple Pie
Skip the top crust entirely and finish with a cinnamon streusel topping.
Perfect if you love crumb toppings.
Make Ahead Instructions
Apple pie is one of the best desserts to prepare ahead.
One Day Ahead
Bake completely.
Cool.
Cover loosely.
Store at room temperature overnight.
The flavors actually improve by the next day.
Two Days Ahead
Bake.
Cool completely.
Refrigerate.
Allow the pie to sit at room temperature for 1 hour before serving.
Unbaked Freezer Pie
Assemble the entire pie.
Wrap tightly with plastic wrap.
Wrap again with aluminum foil.
Freeze for up to 3 months.
Bake directly from frozen, adding approximately 20–25 extra minutes.
Storage
Proper storage helps preserve both texture and flavor.
Room Temperature
Up to 2 days, loosely covered.
Refrigerator
4–5 days in an airtight container or covered with foil.
Freezer
Up to 3 months.
Wrap tightly to prevent freezer burn.
How to Reheat Apple Pie
The oven produces the best results.
Whole Pie
Bake at 325°F for about 20–25 minutes.
Individual Slice
Bake at 325°F for 8–10 minutes.
Or microwave for 20–30 seconds if you’re in a hurry.
What to Serve with Apple Pie
Apple pie is wonderful on its own, but these toppings take it over the top.
- Vanilla bean ice cream
- Homemade whipped cream
- Salted caramel sauce
- Cinnamon whipped cream
- Maple whipped cream
- Vanilla custard
- Sharp cheddar cheese (a classic pairing in some regions!)
- Chopped toasted pecans
- Candied walnuts
- Extra cinnamon sugar
Troubleshooting Apple Pie
Why Is My Filling Runny?
Usually one of these reasons:
- Not enough thickener
- Pie wasn’t baked long enough
- Pie wasn’t cooled completely
Why Is My Bottom Crust Soggy?
Possible causes:
- Filling released too much liquid
- Oven temperature was too low
- Pie wasn’t baked on the lower oven rack
- Apples weren’t thickened properly
Why Did My Crust Shrink?
Usually because:
- Dough became too warm
- Dough wasn’t rested
- Crust stretched while rolling
Always allow pie dough to relax before baking.
Why Did My Apples Stay Firm?
The slices were likely too thick.
Or the pie simply needed another 10–15 minutes in the oven.
Why Did My Pie Overflow?
A little bubbling is perfectly normal.
To avoid large spills:
- Bake on a rimmed baking sheet.
- Don’t overfill the pie.
- Leave vents in the top crust.
Recipe Tips at a Glance
✔ Use a combination of Honeycrisp and Granny Smith apples for the perfect balance of sweetness and tartness.
✔ Slice apples into uniform ¼-inch slices so they bake evenly.
✔ Let the apple filling rest for 15–20 minutes before assembling the pie.
✔ Bake on a rimmed baking sheet to catch any bubbling juices.
✔ Start baking at a higher temperature for a crisp, flaky crust.
✔ Wait until the filling is visibly bubbling before removing the pie from the oven.
✔ Cool the pie for at least 4 hours before slicing for the cleanest cuts.
✔ Brush the crust with an egg wash and sprinkle with coarse sugar for a beautiful bakery-style finish.
Storage
Room Temperature
Store loosely covered for up to 2 days.
Refrigerator
Store covered for up to 5 days.
Freezer
Wrap tightly in plastic wrap and foil and freeze for up to 3 months.
Make Ahead Instructions
Apple pie is one of the best desserts to prepare in advance.
You can:
- Prepare the pie dough up to 3 days ahead.
- Assemble the pie one day before baking.
- Freeze an unbaked pie for future holidays.
- Bake the pie one day ahead—the flavor improves overnight.
Caraway Cookware
If you love baking from scratch as much as I do, quality bakeware makes a noticeable difference. I bake this apple pie in my favorite Caraway Bakeware, which distributes heat evenly for beautifully golden crusts and reliable results every time. Their naturally ceramic-coated bakeware is free of PFAS, PFOA, PTFE, lead, and cadmium, making it a healthier choice for everyday baking. If you’re ready to upgrade your kitchen, click here to shop with my generous discount code applied at checkout!
Reader Success Tips
✔ Weigh your apples if possible (about 3 pounds before peeling) for the most consistent results.
✔ If using very juicy apples, let the filling rest and drain off just a few tablespoons of excess liquid before assembling.
✔ Bake the pie on the lower third of the oven to encourage a crisp bottom crust.
✔ If the crust edges brown too quickly, tent them loosely with foil rather than covering the entire pie.
✔ For the deepest flavor, make the pie a day ahead—many bakers agree it’s even better the next day as the spices meld and the filling fully sets.
✓ Apples sliced evenly
✓ Filling rested before baking
✓ Crust kept cold
✓ Egg wash applied
✓ Pie baked until bubbling
✓ Cooled completely before slicing
Enjoy every buttery, flaky, cinnamon-filled bite of this classic homemade apple pie!
More Cozy Dessert Recipes You’ll Love
If you enjoyed this homemade apple pie recipe, here are a few more reader favorites from the blog:
Cheesecakes
Cookies
- Bakery Style Oatmeal Cookies
- Soft Snickerdoodles
- Bakery-Style Chocolate Chip Cookies
- Bakery Brownies
- Eggless Brownies
- Bakery-Style Peanut Butter
- Cakes
Cozy Fall Favorites
There’s always another homemade dessert waiting to be baked!
Frequently Asked Questions
What are the best apples for apple pie?
Honeycrisp, Granny Smith, Pink Lady, Braeburn, Cosmic Crisp, and Fuji are excellent choices because they hold their shape during baking.
Should I peel apples?
Yes. Peeled apples create the smoothest, most tender filling.
Can I use store-bought pie crust?
Absolutely. A quality refrigerated pie crust works very well and saves time.
Can I make apple pie ahead of time?
Yes. It’s actually even better the following day after the filling has completely set.
How do I keep apple pie from getting watery?
Use the correct amount of thickener, bake until bubbling, and cool completely before slicing.
Do I need to precook the apples?
No. This recipe is designed for raw apples, which develop the best texture during baking.
Why do people mix apple varieties?
Different apples provide different levels of sweetness, acidity, and firmness, creating a more balanced filling.
How long should apple pie cool?
At least 4 hours.
Can I freeze baked apple pie?
Yes. Wrap well and freeze for up to 3 months.
Can I freeze unbaked apple pie?
Yes. Bake directly from frozen, adding extra baking time.
Why is my crust pale?
It likely needed a little more baking time or an egg wash before baking.
Can I make this gluten-free?
Yes. Use your favorite gluten-free pie crust and a measure-for-measure gluten-free flour blend.
Can I reduce the sugar?
Yes. Reduce the total sugar by about ¼ cup without significantly affecting texture.
Can I use only Granny Smith apples?
Yes, though combining them with sweeter apples creates a more balanced flavor.
What spices go well with apples?
Cinnamon, nutmeg, cloves, ginger, cardamom, and allspice are classic choices.
Do I have to use lemon juice?
It’s highly recommended because it brightens the filling and balances sweetness.
How do I know when my pie is done?
The crust should be deeply golden and the filling should be actively bubbling through the vents.
Should I refrigerate apple pie?
After two days at room temperature, yes.
Can I make mini apple pies?
Absolutely. Adjust the baking time to approximately 30–35 minutes.
Can I use frozen apples?
Fresh apples provide the best texture, but frozen apples can work if thawed and drained first.
Why did my apples shrink?
Apples naturally lose moisture while baking, which is why the filling should be mounded high before baking.
Can I add raisins?
Yes! Add about ½ cup for a classic old-fashioned variation.
Can I make this recipe dairy-free?
Yes. Use dairy-free butter and your favorite dairy-free pie crust.
What’s the difference between Dutch apple pie and traditional apple pie?
Traditional apple pie has a double crust, while Dutch apple pie is topped with a buttery crumb topping instead of pastry.
Can I use homemade vanilla extract?
Absolutely. Homemade vanilla adds wonderful depth of flavor to the filling.

Homemade Apple Pie Recipe
Ingredients
- 3 lbs apples (about 8–9 medium), peeled, cored, and sliced ¼-inch thick
- ½ cup granulated sugar
- ⅓ cup dark brown sugar or light brown
- 2 tsp ground cinnamon
- ¼ tsp ground nutmeg
- pinch of cardamom optional
- 2 tbsp cornstarch
- 2 tbsp all-purpose flour or gluten-free flour
- 1 tsp lemon zest
- 1 tsp fresh lemon juice
- 2 tsp vanilla extract
- 2 tbsp unsalted butter cut into small cubes
Pie Crust
- 2 pie homemade crust* or store bought pie crust one for the bottom crust and one for the top crust.
- *homemade pie crust recipe in notes below
Topping (Optional)
- coarse sugar, turbinado sugar
Instructions
- Preheat oven to 425°F.
- Line a rimmed baking sheet with parchment paper or foil.
- Peel, core, and slice the apples into even ¼-inch slices. Place them in a large mixing bowl.
- Toss together sugars, spices, cornstarch, flour, lemon zest, lemon juice, and vanilla extract.
- Allow the filling to rest for 15–20 minutes.
- Roll out one pie crust into a 12-inch circle. Transfer to a 9-inch deep dish pie plate. Leave about 1 inch hanging over the edges.
- Pile the apple filling into the crust. Pour any accumulated juices evenly over the apples.
- Dot with butter cubes.
- Roll out the second crust. Place over the filling or create a lattice design.
- Trim excess dough. Fold edges underneath. Crimp decoratively.
- Cut several vents if using a full crust.
- Whisk together the egg and milk. Brush over the crust.
- Sprinkle with coarse sugar.
- Bake at 425°F for 20 minutes. Reduce oven temperature to 375°F without opening the oven. Continue baking 40–50 minutes, until the crust is deep golden brown, the filling is bubbling, and the apples are tender.
- Transfer to a cooling rack. Cool at least 4 hours before slicing.
Notes
Quick Homemade Pie Crust
Homemade Double Pie Crust- 2½ cups all-purpose flour
- 1 teaspoon salt
- 1 tablespoon granulated sugar (optional, for sweeter pies)
- 1 cup (2 sticks) cold unsalted butter, cubed
- 6–8 tablespoons ice water
Notes
- Use a combination of Honeycrisp and Granny Smith apples for the best flavor.
- Always cool completely before slicing.
- If making ahead, bake the day before serving.
- Refrigerate leftovers after two days.
- Freeze baked or unbaked pie for up to 3 months.
- A metal or ceramic pie plate generally produces a crisper bottom crust than glass.
Nutrition (Per Serving)
Makes 8 servings| Nutrient | Amount |
|---|---|
| Calories | 465 |
| Carbohydrates | 67g |
| Protein | 4g |
| Fat | 21g |
| Saturated Fat | 10g |
| Cholesterol | 38mg |
| Sodium | 255mg |
| Potassium | 248mg |
| Fiber | 4g |
| Sugar | 34g |
| Vitamin A | 8% DV |
| Vitamin C | 9% DV |
| Calcium | 2% DV |
| Iron | 8% DV |


