If you have ever cooked chicken that looked golden on the outside but turned out dry in the middle, brining may be the simple fix you need. A basic chicken brine uses salt and water to season the meat and help it hold on to moisture as it cooks. The result is chicken that tastes seasoned throughout, not just on the surface.
Brining works well for chicken breasts, thighs, drumsticks, wings, whole chickens, and even turkey. It is especially helpful for lean cuts such as boneless, skinless chicken breasts because they can dry out quickly when cooked a little too long.
This guide explains what brine is, how it works, how long to brine chicken, and how to make an easy wet brine at home. I am also sharing dry-brining instructions, food safety tips, cooking temperatures, and answers to the questions home cooks ask most often.
What Is Brine?
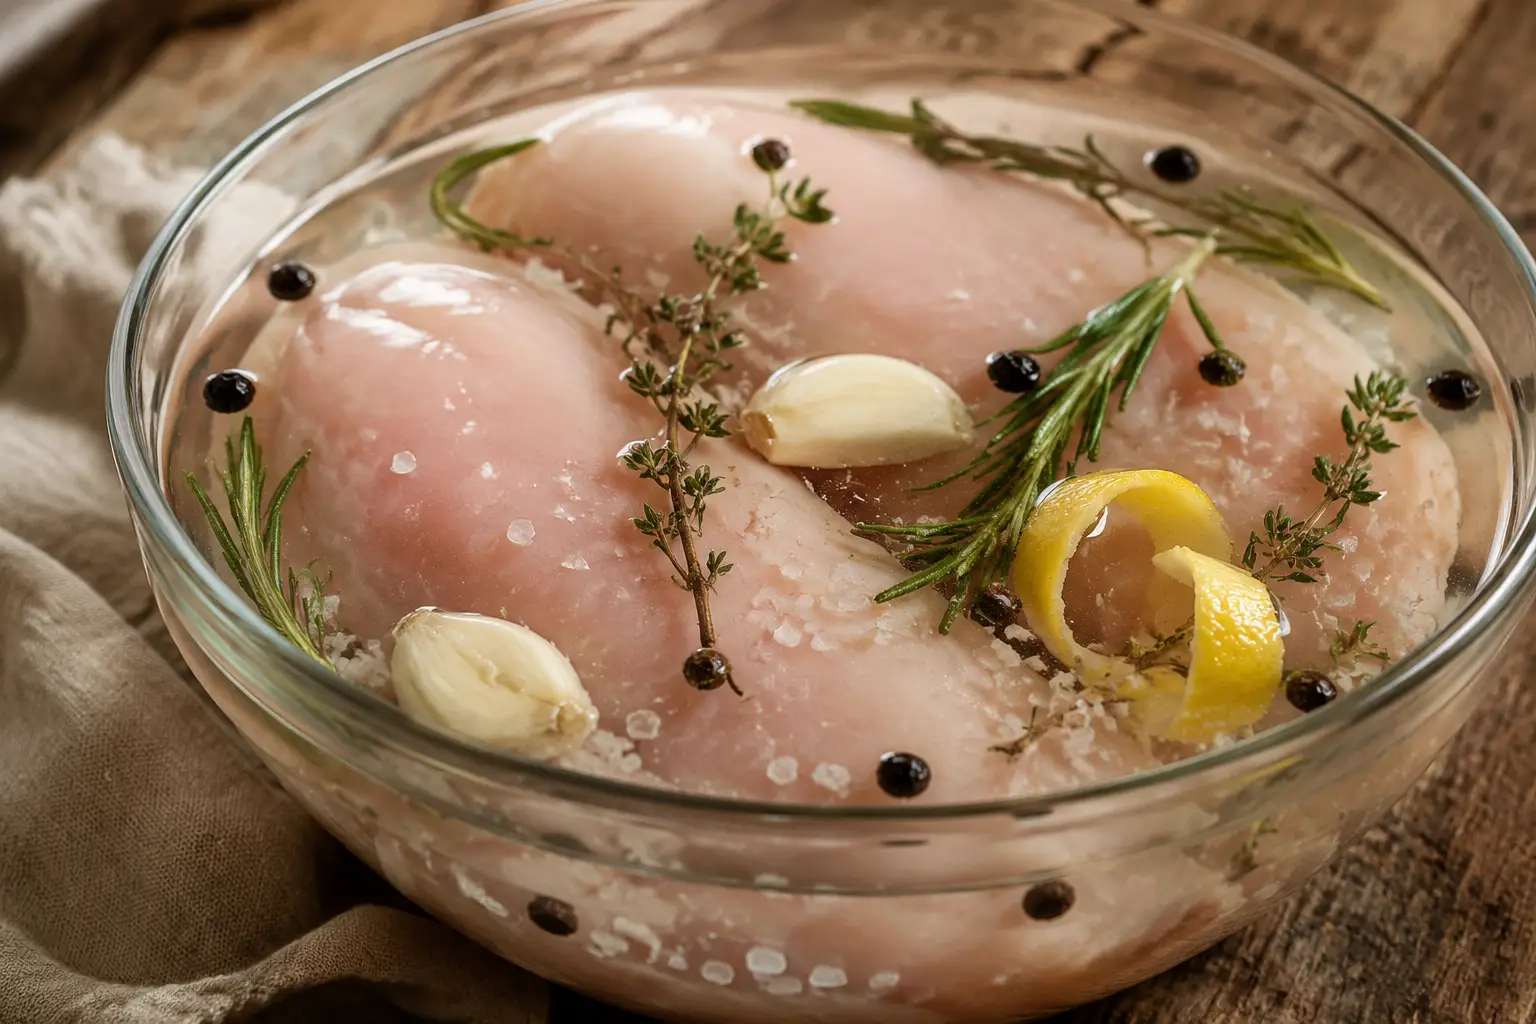
Brine is a mixture of salt and water used to season food before cooking. Some brines also include sugar, herbs, spices, citrus peel, garlic, or other aromatics. The salt is the part that does the main job. The other ingredients add flavor, but they are optional.
When raw chicken rests in a saltwater solution, the salt begins seasoning the meat below the surface. It also changes the way some of the proteins in the chicken behave. This helps the meat retain more moisture during cooking.
You can also brine chicken without water. This method is called dry brining. Instead of soaking the meat, you coat it with a measured amount of salt and let it rest in the refrigerator. Both methods can make chicken juicier and more evenly seasoned.
How Does Brining Chicken Work?
Salt moves into the outer layers of the chicken while it rests. Over time, that seasoning reaches farther into the meat. The salt also loosens some of the protein structure. Those proteins can then hold on to more water as the chicken heats.
Chicken naturally loses moisture during cooking. Brining cannot stop that completely, but it gives the meat a better chance of staying juicy. This is why brined chicken is often more forgiving if it cooks for a minute or two longer than planned.
Brining is different from injecting liquid into chicken. It is also different from marinating. A marinade is mainly used to flavor the surface and may contain oil, acid, herbs, and spices. A brine centers on salt and moisture retention.
Why Brine Chicken?
Chicken is naturally lean, especially boneless, skinless chicken breast. Without much fat to protect it, the meat can go from tender to dry quickly.
Brining chicken can help:
- Season the chicken beyond the surface
- Keep chicken breasts moist during cooking
- Make roasted chicken more forgiving
- Add flavor to mild cuts
- Create better texture
- Support browning when the chicken is dried properly
- Reduce the chance of dry, bland chicken
Brining will not fix chicken that is heavily overcooked, but it does give you a little more room for error.
Wet Brine vs. Dry Brine
Wet brining means soaking chicken in salted water. It works quickly, distributes salt evenly, and is an easy method for beginners. It does require a container large enough to hold the chicken and enough refrigerator space to keep everything cold.
Dry brining means sprinkling salt directly over the chicken and refrigerating it uncovered or loosely covered. There is no water and less mess. The uncovered refrigerator rest can also dry the skin, which helps whole chickens, thighs, drumsticks, and wings become crisp when roasted or air fried.
Choose wet brining when your top goal is moisture, especially with boneless chicken breasts. Choose dry brining when you want juicy meat with crisp, browned skin.
Easy Chicken Brine Recipe
This basic brine makes enough for about 2 to 4 pounds of chicken pieces. Double it for a whole chicken if needed, making sure the chicken stays fully covered.
Ingredients
- 4 cups cold water, divided
- 1/4 cup Diamond Crystal kosher salt or 3 tablespoons Morton kosher salt
- 2 tablespoons brown sugar or granulated sugar, optional
- 2 garlic cloves, lightly crushed, optional
- 1 teaspoon whole black peppercorns, optional
- 2 sprigs fresh rosemary or thyme, optional
- 1 bay leaf, optional
- 2 cups ice, if heating part of the water
- 2 to 4 pounds chicken
Instructions
- Add 2 cups of water, the salt, and sugar to a small saucepan. Warm over medium heat, stirring just until the salt and sugar dissolve. The water does not need to boil.
- Remove the pan from the heat. Add the garlic, peppercorns, herbs, and bay leaf if using.
- Pour the mixture into a large bowl or food-safe container. Add the remaining 2 cups of cold water and the ice. Stir until the brine is completely cold.
- Add the chicken. Make sure every piece is submerged. Place a small plate over the chicken if needed to keep it below the surface.
- Cover and refrigerate for the recommended time based on the cut of chicken.
- Remove the chicken from the brine and discard the used liquid. Pat the chicken very dry with paper towels. Do not reuse the brine.
- Season lightly, if needed, and cook using your preferred method.
Why Kosher Salt Measurement Matters
Not all salts weigh the same by volume. A quarter cup of one brand can contain much more salt than a quarter cup of another. Diamond Crystal kosher salt has larger, lighter flakes than Morton kosher salt, so the amounts are not interchangeable cup for cup.
For the most accurate brine, use 40 to 45 grams of salt for every 4 cups of water. A kitchen scale removes the guesswork. If you do not have one, follow the brand-specific measurements in the recipe.
Table salt is much finer and packs tightly into a measuring cup. If table salt is your only option, use about 2 tablespoons for 4 cups of water. Check that it is fully dissolved before adding the chicken.
How Long to Brine Chicken
The best brining time depends on the size of the cut, whether it has bones, and whether you are using a wet or dry brine. Smaller pieces absorb salt faster than a whole bird.
Wet Brine Times
- Boneless, skinless chicken breasts: 30 minutes to 2 hours
- Bone-in chicken breasts: 2 to 4 hours
- Boneless chicken thighs: 1 to 3 hours
- Bone-in chicken thighs: 2 to 4 hours
- Chicken drumsticks: 2 to 4 hours
- Chicken wings: 1 to 2 hours
- Whole chicken weighing 3 to 5 pounds: 8 to 12 hours
Do not leave chicken pieces in a strong wet brine overnight unless the recipe was written for that long rest. Too much time can make the meat overly salty or give it a soft, slightly ham-like texture.
Dry Brine Times
- Boneless chicken breasts: 1 to 4 hours
- Chicken thighs or drumsticks: 4 to 12 hours
- Chicken wings: 4 to 12 hours
- Whole chicken: 12 to 24 hours
Dry brining is slower because the salt first draws a little moisture to the surface. That moisture dissolves the salt, and the seasoned liquid is then pulled back into the meat.
How to Dry Brine Chicken
Pat the chicken dry and place it on a wire rack set over a rimmed baking sheet. Sprinkle it evenly with kosher salt, using about 1/2 teaspoon Diamond Crystal kosher salt per pound of chicken. If using Morton kosher salt, use slightly less.
Refrigerate the chicken uncovered for the recommended time. Keeping it uncovered is helpful when the chicken has skin because the cool refrigerator air dries the surface. A dry surface browns more readily than a wet one.
Before cooking, do not rinse the chicken. Add pepper, garlic powder, paprika, herbs, or your favorite salt-free seasoning. Avoid adding another salty seasoning blend unless you reduce the dry-brine salt.
Can You Add Flavor to Chicken Brine?
Yes, but keep your expectations realistic. Salt travels into meat more readily than flavor from herbs and spices. Aromatics can lightly flavor the outer portion of the chicken, but they will not season the center as strongly as salt does.
Good additions include:
- Brown sugar, honey, or maple syrup for light sweetness and better browning
- Garlic cloves
- Black peppercorns
- Bay leaves
- Rosemary, thyme, sage, or parsley stems
- Lemon or orange peel
- Crushed red pepper flakes
- Coriander seeds
- Mustard seeds
Avoid adding a large amount of lemon juice, vinegar, or another acid to a long brine. Acid can change the meat’s texture, especially when chicken pieces sit for several hours. Add citrus peel for aroma, then serve the cooked chicken with fresh lemon juice if you want a brighter taste.
Is Sugar Needed in Chicken Brine?
No. Salt and water are the only ingredients needed for a basic chicken brine.
Sugar can balance the salty flavor and help the outside of the chicken brown. It may also add a slight sweetness, depending on how much you use. Brown sugar, granulated sugar, honey, and maple syrup can all be used.
If you plan to grill or cook the chicken over high heat, watch it closely. Sugar can cause the outside to brown faster.
How to Brine Chicken Breasts
Boneless, skinless chicken breasts only need a short soak. Place them in cold brine for 30 minutes to 2 hours. One hour is a good starting point for average-size breasts.
Remove the chicken, pat it dry, and season it with pepper, paprika, garlic powder, or a salt-free blend. Sear it in a hot skillet, bake it at 400°F, grill it, or air fry it until the thickest part reaches 165°F.
If the breasts vary in thickness, gently pound the thicker ends so the pieces cook more evenly. Brining adds some protection from dryness, but even thickness still makes a big difference in timing.
How to Brine Chicken Thighs
Boneless chicken thighs can stay in a wet brine for 1 to 3 hours. Bone-in thighs can brine for 2 to 4 hours.
Chicken thighs contain more fat than breasts, so they are naturally less likely to dry out. Brining still adds flavor and helps season the meat below the surface.
After brining, pat the thighs dry. If the skin is attached, let the chicken rest uncovered in the refrigerator for an hour or two. This dries the surface and helps the skin become crisp during cooking.
How to Brine Chicken Wings
Chicken wings usually need only 1 to 2 hours in a wet brine. For a dry brine, refrigerate them uncovered for 4 to 12 hours.
Dry brining works especially well for wings because it seasons the meat while drying the skin. Dry skin produces a better texture when the wings are baked or air fried.
Pat wet-brined wings very dry before adding any seasoning. Avoid salty wing rubs after brining.
How to Brine a Whole Chicken
For a 3 to 5-pound whole chicken, make enough cold brine to cover the bird completely. Refrigerate it in the brine for 8 to 12 hours.
A stockpot, brining bag placed inside a sturdy container, or food-safe bucket can work as long as it fits in the refrigerator.
Remove the chicken, discard the brine, and pat the bird dry inside and out. For crisper skin, set it uncovered on a rack in the refrigerator for several hours after wet brining.
Roast according to your recipe, checking both the breast and the innermost part of the thigh with a thermometer.
Do You Rinse Chicken After Brining?
No. Rinsing raw chicken can splash bacteria onto the sink, faucet, counter, and nearby dishes. It is safer to lift the chicken from the brine, let the extra liquid drip off, and pat it dry with disposable paper towels.
If you followed a balanced brine recipe and stayed within the suggested time, rinsing should not be needed.
When chicken tastes too salty after brining, the usual cause is too much salt, the wrong type of salt, or too much time in the brine.
Why You Must Cool Brine Before Adding Chicken
Chicken must stay at 40°F or colder while brining. Never place raw chicken into warm brine. Warm liquid can bring the meat into the temperature range where bacteria grow quickly.
Heating part of the water is only meant to dissolve the salt and release some flavor from the aromatics. Add cold water and ice afterward, then check that the liquid is fully chilled before adding the chicken.
Keep the covered container in the refrigerator for the entire brining period. Do not brine chicken on the counter, even for a short time.
How to Cook Brined Chicken
Brined chicken can be roasted, grilled, baked, pan-seared, smoked, or air fried. The cooking method does not need to change, but a few small steps help produce a better finish.
First, pat the chicken very dry. Moisture on the outside slows browning and can prevent the skin from becoming crisp.
Second, use less salt in your rub, breading, sauce, or pan seasoning. The chicken has already absorbed salt from the brine.
Cook chicken to a safe internal temperature, checking the thickest part with an instant-read thermometer. Chicken is safe at 165°F.
For chicken breasts, I usually remove them from the heat close to that point so they do not keep cooking far past it. Dark meat such as thighs and drumsticks often becomes more tender around 175°F to 185°F, even though it is safe at 165°F.
Let cooked chicken rest for 5 to 10 minutes before slicing. Resting gives the hot juices time to settle inside the meat instead of spilling onto the cutting board.
How to Bake Brined Chicken Breasts
Preheat the oven to 400°F. Remove the chicken breasts from the brine and pat them very dry.
Rub the chicken lightly with olive oil. Season it with black pepper, garlic powder, paprika, Italian seasoning, or another salt-free blend.
Place the chicken in a lightly greased baking dish or on a rimmed sheet pan. Bake for 18 to 25 minutes, depending on the thickness.
Check the thickest part with an instant-read thermometer. Remove the chicken when it reaches 165°F. Let it rest for 5 to 10 minutes before slicing.
How to Grill Brined Chicken
Remove the chicken from the brine and dry it thoroughly. Lightly coat it with oil and add salt-free seasonings.
Preheat the grill to medium-high heat. Clean and oil the grates to reduce sticking.
Grill boneless chicken breasts for about 5 to 7 minutes per side, depending on thickness. Bone-in pieces will need more time and may cook better over a mix of direct and indirect heat.
Always use a thermometer to check the thickest part. Do not rely only on grill marks or the color of the outside.
How to Air Fry Brined Chicken
Brined chicken works well in the air fryer because the hot air cooks the outside quickly. Pat the chicken completely dry before placing it in the basket.
Lightly coat the chicken with oil and salt-free seasoning. Arrange it in a single layer without crowding.
Cooking times will vary by cut and air fryer. Boneless breasts may take 12 to 18 minutes at 375°F, while thighs and drumsticks may need 18 to 25 minutes.
Turn the pieces halfway through cooking and check the internal temperature before serving.
Common Brining Mistakes
- Using Too Much Salt
Measure by weight when possible, or pay close attention to the type and brand of salt. Fine salt is more concentrated by volume than coarse kosher salt.
- Brining for Too Long
More time does not always mean more moisture. Small chicken pieces can become too salty and develop a strange texture if left in brine too long.
- Adding Chicken to Warm Brine
Always chill the brine fully first. The refrigerator should keep the chicken at 40°F or colder.
- Forgetting to Dry the Surface
Wet chicken steams before it browns. Pat it dry well, especially if you want crisp skin or a deep golden sear.
- Adding a Salty Rub After Brining
Taste starts with the brine. Use salt-free spices afterward, or reduce the salt in your usual seasoning mix.
- Brining Chicken That Is Already Seasoned
Some packaged chicken is injected or treated with a salt solution. Look for wording such as “contains up to X percent of a solution” on the label. Brining treated chicken can make it too salty.
- Reusing Chicken Brine
Never reuse brine that has touched raw chicken. It may contain harmful bacteria. Discard it after removing the meat.
How to Keep Chicken Submerged in Brine
Chicken needs to stay under the liquid for even brining. If it floats, place a small plate, bowl, or food-safe weight on top.
You can also use a large food-safe storage bag. Place the bag inside a bowl before adding the chicken and brine. The bowl supports the bag and catches leaks.
Press out excess air before sealing the bag. Turn it once during brining if part of the chicken is not fully covered.
What Container Should You Use for Brining?
Use a nonreactive, food-safe container that fits inside your refrigerator.
Good choices include:
- Glass bowls or casserole dishes
- Stainless steel pots
- Food-safe plastic containers
- Food-safe brining bags placed inside a bowl
Avoid aluminum, copper, and other reactive metals. Salt and acidic ingredients can react with these materials and leave an unpleasant taste.
Can You Freeze Chicken After Brining?
Yes. Remove the chicken from the brine, pat it dry, and freeze it in an airtight freezer bag or container.
Label the package so you remember that the chicken is already salted. For the best texture, freeze it promptly rather than letting it sit for another day after brining.
Thaw frozen chicken in the refrigerator before cooking. Season it with salt-free spices until you know how salty the finished meat will be.
Is Brined Chicken Healthy?
Brining does not add much sugar unless the recipe uses a sweetener, and most of the sweetened liquid is discarded. It does add sodium.
The exact amount absorbed is hard to calculate because it changes with the salt level, brining time, size of the chicken pieces, and cooking method.
If you follow a lower-sodium diet, ask your healthcare professional whether brined food fits your needs. A shorter brining time or a dry brine with a carefully weighed amount of salt may make sodium easier to control.
Basic Chicken Brine Recipe Card
Description: A simple saltwater brine that helps chicken cook up juicy, tender, and seasoned throughout.
Prep time: 10 minutes
Brining time: 30 minutes to 12 hours, depending on the cut
Total time: 40 minutes to 12 hours 10 minutes
Yield: Enough brine for 2 to 4 pounds of chicken
Category: Cooking Basics
Method: Brining
Cuisine: American
Ingredients
- 4 cups cold water, divided
- 1/4 cup Diamond Crystal kosher salt or 3 tablespoons Morton kosher salt
- 2 tablespoons brown sugar, optional
- 2 garlic cloves, crushed, optional
- 1 teaspoon black peppercorns, optional
- 2 fresh herb sprigs, optional
- 1 bay leaf, optional
- 2 cups ice, if needed for chilling
- 2 to 4 pounds chicken
Directions
- Warm 2 cups of water with the salt and optional sugar, stirring until dissolved.
- Remove the mixture from the heat and add any optional aromatics.
- Add the remaining cold water and ice. Cool the brine completely.
- Submerge the chicken, cover, and refrigerate for the recommended time for your cut.
- Remove the chicken and discard the brine. Pat the chicken dry. Do not rinse it.
- Cook until the thickest part of the chicken reaches a safe internal temperature of 165°F.
Notes
- Never add raw chicken to warm brine.
- Keep the chicken refrigerated while it brines.
- Check the package to make sure the chicken was not already treated with a salt solution.
- Use less salt in any seasoning added after brining.
- Do not reuse brine that has touched raw chicken.
Estimated Nutrition Information
Brine absorption varies, so nutrition software cannot give an exact sodium count for the finished chicken. The values below are a rough estimate for 4 ounces of cooked, skinless chicken breast after brining. They do not include a sauce or cooking oil.
- Calories: 185
- Protein: 35 grams
- Fat: 4 grams
- Carbohydrates: 0 grams
- Fiber: 0 grams
- Sugar: 0 grams
- Sodium: approximately 450 to 750 milligrams
Nutrition numbers are estimates and will change based on the chicken, salt concentration, soaking time, and cooking method.
More Recipes to Try
After you learn how to brine chicken, use the same thermometer and moisture-saving habits in roasted chicken, grilled chicken breasts, air fryer chicken, chicken wings, chicken wraps, or meal-prep bowls.
This guide also pairs well with posts about how long to marinate chicken, why chicken turns rubbery, how to rest meat after cooking, and the Maillard reaction.